
I thought I would post details of what we did, the cost for the project and how it has held up for us. Ahem. I meant to post last August. Now it is January 2015 and I am finally getting to this project 🙂 Perfect timing for those that might be considering spring and summer projects – plus we have lived with it for several months so I can tell you how it held up to some pretty nasty storms over the winter.
EDITED: Now it is April 2016 and the project still looks exactly the same. The pictures in this post are updated to reflect how to the pergola still looks over a year later. We did add a TV to the pergola so I will show you how we did that.

This project was pretty awesome. We live in Northern California and the winds here can be incredibly strong plus it gets very hot in summer. We purchased a gazebo several years ago for about $300 and held up for exactly one summer. It was really hard to disassemble so we wound up keeping it up for fall and winter and it took a beating. In late winter I went outside after a nasty wind storm and very literally found the entire gazebo structure in the pool. That was super fun to fish out and I was already unhappy because the gazebo was dark brown and the colors of the fabric had really faded in the sun and just looked shabby. After just a few months- boo!
So we decided a more solid structure was in order. We did request quotes from contractors and looked at some pre-made kits from home improvement stores and discovered it would be about $700 to $2000 for a pergola. Ouch! More then we wanted to spend on this project.
We had discussed just building our own from scratch and one day my husband comes back with the supplies from Home Depot and boom! He was ready to get started :).
So when it was all said and done we spent roughly $400 on materials and it took about 2 days. My husband did most of it by himself and two of those days were weekends so he spent probably 2 almost full days on the project and then a few hours after work on it. Execute your DIY projects properly with professional tools from Mitre 10 Catalogue sales. At least $100 of the budget was sun shades so if you don’t need those, your project will be cheaper.
This project is one of those that seems more complicated or difficult then it really is and doesn’t require tons of fancy tools or special skills.
The most important thing about this project is ensuring the structure is very safe and sound and I think we did do that. I can tell you we had a few nasty storms over the winter and the pergola did not budge at all. It still looks really great!
So here are the steps that we took to build the pergola plus a few little extras that we did to snazz our structure up a bit.
Here is the before:
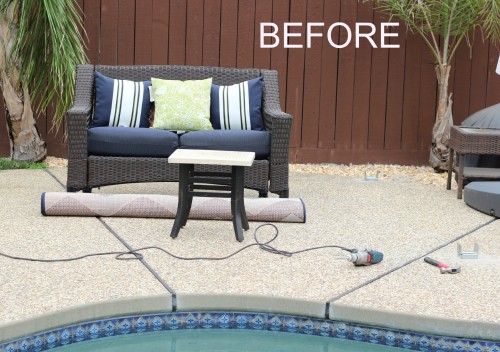
Boring and super ugly concrete and pitiful palm trees- gah!
As I mentioned above the pergola needed to be incredibly strong and secure. It sits in front of the pool and we have kids that climb, jump, pull and hang on everything so delicate is not really an option. Plus the winds in Sacramento are crazy so I didn’t want a pergola flying through the kitchen window one day ;).
Our pergola is a free standing unit but you can build one that is attached to a deck or house very easily.
*Note my husband and I did this entirely ourselves with some minor assistance from our landscape design crew (Adriana 7 years and Maya 5 years). You can totally do this yourself too!
———-Step 1: Design——–
We started by measuring where the structure would go and drafting a rough design. We didn’t want anything too intricate but we still wanted something that looked nice and would stand the test of time- so our design is fairly simple. We also took into consideration building permits. Our structure is small enough to not require a building permit but you might want to check on ordinances in your area before you get started.
You can choose whatever type of lumber you prefer. We used a pressure treated hem-fir lumber that was already stained dark brown. Cedar or pine would also be gorgeous and you can stain it any color that you like. You probably want to use Thompson’s water seal to protect your wood and I would do that before assembling everything.
———-Step 2: Dig it baby!——–
If you are going into the dirt, you will need to dig a hole and use concrete to bury your posts. (Find a more detailed post about how to bury posts in concrete here).
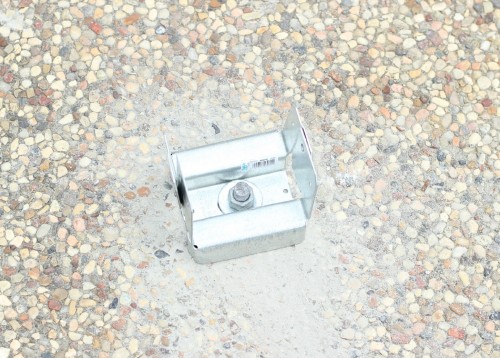
We were going into concrete so we used a rotary hammer and masonry bit and went roughly 4 inches into the concrete.
Next we used 4×4 EZ Bases to secure the posts into the concrete.
We went ahead and started to assemble the structure right where it would stand.
———-Step 3: Build and they will come——–
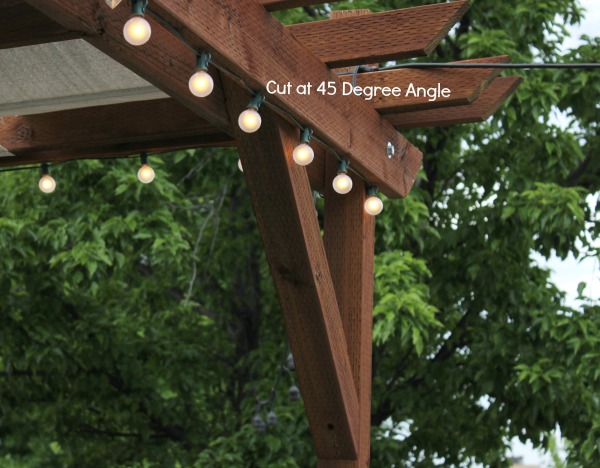
To do this we first attached (4) 2 x 8 x 12 pressure treated studs to (4) 4 x 4 x 10 posts. We drilled holes through the 2×8 and 4×4- using bolts for additional reinforcement. We cut the corners of the 2 x 8 at a 45 degree angle to make it a little more decorative. You can skip this step if you prefer the flush ends. You can see the angled beams in the photo below- it adds a nice touch and is pretty simple to just make the extra cuts on the end.
Once you have your wood frame assembled, push the posts into the EZ Bases.
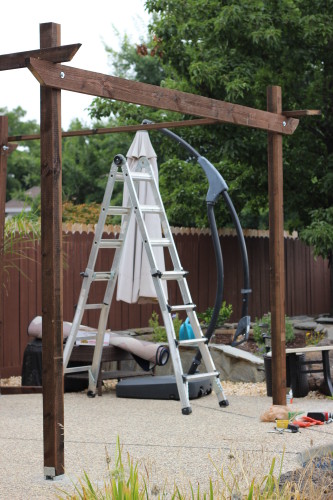
Screw the bases into the posts. We used galvanized screws. I just held the frame up while my husband zipped around to each of the (4) posts and screwed them into place.
We chose to use (11) pressure treated 2 x 4 x 12’s and positioned them evenly across the top of the frame. Once they are evenly spaced on the top, screw them into the frame. We used 4 inch screws to attach the wood to the frame.
You can use fewer beams depending on the look that you want. If you want to grow Jasmine or something on your Pergola- you might want to use more beams so that the space in between is closer together. In cooler climates where you don’t need the shade from the Pergola, you can probably get away with using fewer beams on top.
It is hot as heck in Sacramento and we wanted this structure to serve many different functions- including shade in the summer so we used more beams with the intention of weaving in a sun shade once we finished.
We cut 4 x 4’s into 30 inch pieces at a 45 degree angle using a miter saw. That creates the corner bracing for the pergola. We also screwed those in with 4 inch screws. If you have a Jigsaw you can make even fancier edges.
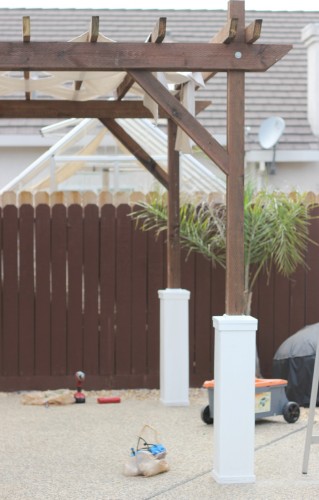
———-Step 4: I’m So Fancy——–
We decided to try and give the pergola a little more of a custom look by adding boxes to the base. We used 2 x 8 x 6 and cut them in half to make them 36 inches tall for the base. We primed and painted the boxes white. You can get very detailed directions on how to make the boxes by clicking the Ana White tutorial here. We actually did not use her tutorial for our project but the end result does look very similar.
Often Pergolas don’t serve any real purpose other than defining an outdoor room. We actually needed ours to offer shade in summer so we added a few more touches. If you don’t need the shade, your project should be even cheaper.
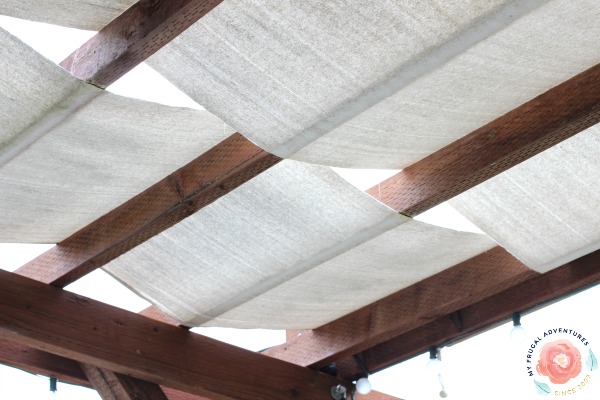
For shade you can go a few different routes. The easiest option is to purchase actual sun shades which are 20 feet long. You should only need about 12 feet so you can either have some hanging over or trim it to the right size. This can kind of add up- we would have needed (4) so $140 or so.
As a cheaper alternative, we took a standard 12 x15 painter’s tarp and cut that into (4) equal strips. Next we treated the tarp by painting equal parts of standard school glue and water all around the sides. You don’t need to do the entire tarp- just about 6 inches in or so from the edges. This will prevent any fraying of the tarp so it is a time consuming but worthwhile step. You can see above the tarp is nice and clean when it is weaved into the top- no little strings and such hanging off the sides. (Update: the following year we did have some tiny strings that needed to be trimmed off. So the school glue does work but a year later there was about 10 minutes of maintenance needed on the tarp in the form of trimming off little strings. Sewing would be the best option if possible.)
We did need to trim the tarp down a bit to exactly the right size – our strips were roughly 2 1/2 feet.
To get a taut finish for the tarp and to ensure it didn’t wind up blowing off the pergola and into the pool, we screwed the tarp into the top of the frame with screws and washers. We used 24 screws so the tarp would be super secure.
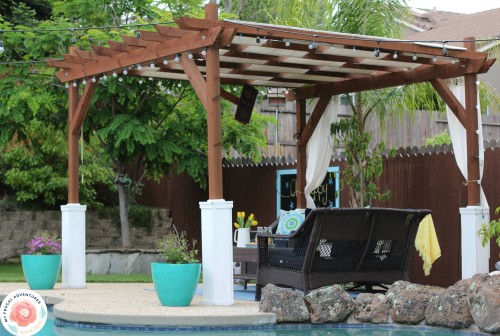
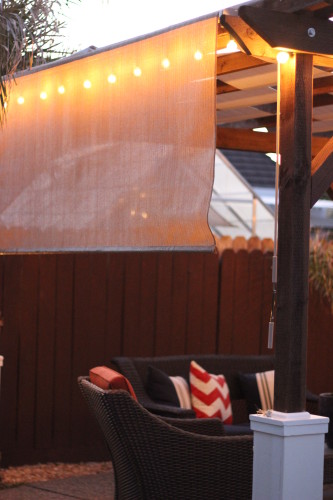
The last two steps were adding a sunshade to one side of the pergola and lights. We got a 6×9 sunshade and attached it to the side and you can crank it up or down to provide additional shade. We live in Sacramento so it gets very hot in summer and the extra bit of shade is really worth it. This year we want to add more privacy to the backyard so we might add another sun shade to the back of the pergola or we might add some larger trees against the fence.
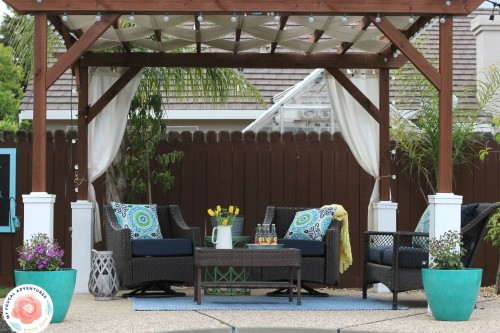
And the very last step was adding globe lights all around the base– they look so gorgeous at night! Ours twinkle in the pool water and look so peaceful- I highly recommend these for beautiful ambiance at night.
So that was last summer’s project! This summer I can’t wait to replace our old fence with a brand new one and I will get some updated pictures of the pergola a year later with (hopefully) a gorgeous new fence around it.
Here are a few more pictures of the finished product– please excuse our sad old fence and the neighbors about 2 inches away (welcome to California!)
Sunshade cranked down a bit- it actually goes almost down to the ground.
And the later addition of the TV:
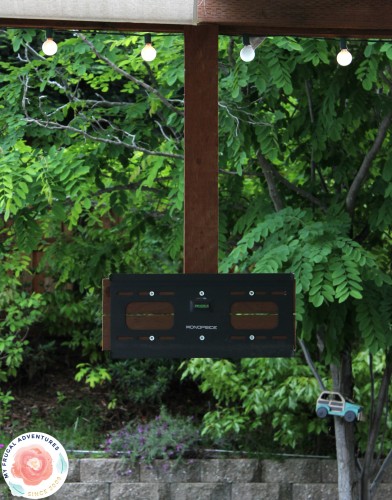
We actually added this little detail very quickly late last summer when there were a few big soccer games on TV. We invited some friends over to watch the games and wanted to entertain outside so my husband quickly added this T-Shape with a flat screen tv mount (similar to this one.)
We have an extra flat screen in the guest room that gets moved outside when we want to have movie night or friends over and then back inside when we are done.

I want to mention my husband works for a broadband company so he is very comfortable with all this stuff and very quick at hooking things up and whatnot. We have power at our pool pump (located just past the post on the left side of the pergola in the photo above) so we can just bring a cable box outside and the TV plays anything. If you want to have TV or movies here are three options- consult your local cable provider and see if they can wire your outdoor space, some cable companies offer wireless receivers that would be very easy to move in and out, and a third option would be a Roku or other streaming device to just play movies. If we had a larger yard space I would look into one of these projectors too and maybe consider that to project movies onto the fence or onto the sun screen that pulls down on the side of the pergola.

Let me know if you decide to tackle a DIY pergola this summer! I’d love to hear how yours works out!
And if you like this post, you might also like:
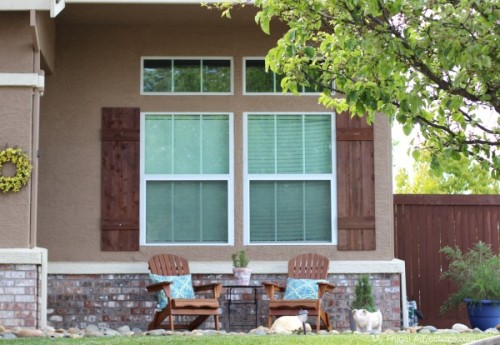
How to Build Shutters (in 15 minutes!)

How to Start a Vegetable Garden
Hi Carrie,
We mounted a cheap curtain rod from Target to the back. Super easy 🙂 It isn’t noticeable since the back of the pergola backs up to the fence.
Great Project!! Did you notice any kind of movement once your pergola was completed? We followed your directions with some modifications an noticed some play in the structure.
Hi Jeremiah,
Thanks! No we have not had any movement at all. Is yours in concrete or dirt? In Sacramento we get some really strong winds and we haven’t noticed any movement at all.
I hope you are happy with your pergola! 🙂
This looks so good! I’m really glad you included the before picture, because it really give some perspective on how much the Pergola improved the space. Is the TV holder on a hinge so it can tuck away when not in use? It’s hard to tell from the picture, but I love that idea.
Danielle,
We aren’t super thrilled with the TV hinge- it just slides up to get out of the way when not in use. My husband always worries it might slip and conk someone in the head. We love the TV out there and so far it has worked beautifully with no slips. We do need to tinker a bit more to be sure when it is put up, it is very safe.
OMG – this is just what I needed to read!!! We live in Sacramento and all of the concerns that you covered were exactly why we haven’t tried to tackle a Pergola. So happy to see that maybe we can have one too! Shade is a must right now and the fact that you have a TV is an added bonus. I am showing my husband and will be measuring our space tonight 🙂
THanks so much for sharing your project!!!
Traci
Yeah! So happy to hear that Traci 🙂
It’s beautiful. I love the way you added the boxes to the posts to give them some character! I may just tackle making one myself now. Of course, every time I start a project myself, my husband takes it over, so that may just work out perfectly for me. LOL
🙂 gwingal
Nikki you have it made as far as I am concerned 😀 I have so many projects I start and then don’t finish around the house. Please tell him he is invited over anytime he likes!
one of the best how to’s out there, thanks!
Kaley I appreciate that so much!
Hi I was wondering can you tell me what size is your pergola?
Hi Elaine,
It is a 10×10 structure.
Hello,
I had a quick question. The bolts that you used to secure the (4) 2×8’s to the (4) 4×4’s…did you use a single lag bolt all the way through? Or did each 2×8 have their own bolt to the 4×4? thanks!
Another quick question…how exactly did you attach the “roof” – the top cross beams? What length screws, and where were they placed?
We live in Florida, so I hear ya about both the wind and the need for shade! Thes is Perfect, as a lot of the designs are much more complicated! Thanks!
Hi! I have same question as previous post that wasn’t answered! I need to know bolt specs for what you used. What length lag bolt did you use????
Well, this is exactly what I needed to find to have built onto my patio. However; do you think I could use your plans to enclose the patio and put roofing on it later? My HOA has decided my cat does not belong outside so it’s the least I can do to let him be “outside.” I am trying to think of inexpensive ideas now for my catio that later I can add the roof, etc.
Hi Constance. Sorry to hear that. I am not sure what type of roofing you have in mind. This might be nice for your cat but seems like you might almost need more of a greenhouse to keep him in? We have the opposite issue. There is a neighborhood cat that always comes to sleep right on the blue sofa you see in the picture. Makes me crazy because he pees on the carpet and leaves dead birds and stuff 😛 I want to keep the cat out and you want to keep the cat in. Good luck!
Hi Sandy and Dawn,
I don’t remember the exact bolts we used but I do remember they were 8 inch lag bolts. I hope that helps!
Where did you buy your lumber? I’ve never seen wood already stained but that would be such a huge time saver. Thanks for such an amazing tutorial. This is next on our honey-do list and I can’t wait. I only wish it will be half as beautiful as yours!!
Hi Rebecca,
I *think* we bought it at Home Depot. It may have been Lowe’s though. It is pressure treated wood which we were not aware at the time contains toxic chemicals that can be harmful 😉 I think I mentioned it in the post, you just have to be super careful not to get splinters and have the kids play on the wood before building and such… I haven’t noticed this type of lumber recently and maybe they stopped selling it because of the chemical issue? I’ll look the next time I go. Probably this weekend ;D
Your pergola is beautiful! Great job. We are considering building one over our fire pit behind the pool. Thanks for sharing your tips.
Hello,
Do you have a list of the materials all in 1 location? Also, I am sorry if I missed it, but where in the instructions at the bottom is the additional info for installation into the ground. My husband and I would like to attempt this project in a couple weeks 🙂 Super excited as yours turned out beautiful!! We are in Sunny South Florida- lots of rain in the summer….not sure if you had any suggestions or ideas on how to address the rain.
Thank you
I would also like information for installation into the ground!
Hi there! this looks absolutely amazing! i just wanted to ask… for wetter places like manchester in England what could we use as the roofing? hope you could help. thank you
Hmm.. have you looked into corrugated metal Iqra? Also- keeping Manchester in our prayers right now. I hope you and your family are safe and well.
Hi there! We are building a pergola with this plan but we were wondering how you attached the top beams? There are all kinds of braces and brackets but I didn’t see that you listed any. Thanks in advance!
How did you attach the 2×4 beams to the frame? I see the ones on the ends are attached to thr 4×4 posts, but what about the others going across the top? Can you add a photo please? This is exactly what I wanted!
The reason the cat pees on the carpet is to mark the territory as his so other animals will know it has his and the reason for the dead birds and stuff is because he’s leaving you a little thank you gift he’s sharing what he (a cat likes)with you
Hi Janet- I do know a little about cat behavior but it is still frustrating. 🙂 I know the cat means well but it is still no fun to have animal urine and feces on the patio set.
Looks great I’m gonna copy it. Can you tell me more about the sun shade crank set up, is it store bought or you made it?
Hi Oscar it was pretty affordable at Lowe’s. We bought it 🙂
Hi! Do you have any more details on how you connected the pressure treated 2 x 4 x 12 top members to the frame? I know you mentioned you used 4″ screws but I wanted to see where/how they were installed. Awesome tutorial, we plan on building this weekend!!
Could you share how you attached the top beams to the frame? Thank you!
Hi Melissa and Andrea,
We drilled a hole halfway through the top of the board- about 2 inches deep and used 4 inch screws. So the screw goes through the hole and into the remaining 1.5 inches of the board and then into the frame of the pergola. Does that make sense?
Charlene
Gorgeous. Did you leave the “sun shades” – the painter’s cloth up through the winter rains?
Hi Monica,
Yes but please note we live in California. We get rains and storms but the weather is fairly mild compared to other parts of the country. After the winter we did need to take scissors and trim off a bunch of pieces on the sides that had unraveled but the original tarp actually help up really well.
Thanks for sharing this. I used this to help with planning and budgeting for my 12×20 pergola. We had been quoted as 4K for it to be built, but built with my niece for under $500.
Oh that is fantastic Dan! So happy to hear that!
Could a person use the water proof spray for Tents instead of school glue ; and where would a person purchase that large of an amount to cover each…
What size is it? We want to build one
Sooooooo, did you actually build this? Why are half the pictures photoshopped?
Hi Andrew- yes I did build this and I actually don’t know how to use Photoshop so I can promise that nothing was photoshopped. There is minor editing do brighten photos, crop photos etc… but that is it. I have actually photographed this pergola a few different times over the years. You can see the same structure with different photos:
https://www.pinterest.com/pin/7599893107446372/
https://www.pinterest.com/pin/AcDZVpuge4iShM1fzUIfTYGCtHbTAQ6eXWTopmv-_8df-CPBHbmHw2M/
And an old Instagram post:
https://www.instagram.com/p/BmfBB0mhTye/
another old instagram post:
https://www.instagram.com/p/7CDJ3UNZG-/
and a third old Instagram post:
https://www.instagram.com/p/rtIasRNZDV/
We recently replaced the fence so I’ll probably photograph again soon with our new set up.
Thank you for the compliment though!
Oh and two more from Instagram from the building process:
https://www.instagram.com/p/rbBzEANZH9/
https://www.instagram.com/p/rVdrDftZHW/
Thanks SO much for the pictures, explanation, and INSPIRATION! We had dreamed of building a pergola behind our home, but Hurricane Michael made sure we HAD to (after we lost 3/4 of our shade trees; just thankful that our home remained intact, as we were only 15 miles from the wall landfall!) It was a BEAR to build (some things sound/look so simple….(LOL!), but its done, sturdy, and SHADY! 😉