
I thought I would post details of what we did, the cost for the project and how it has held up for us. Ahem. I meant to post last August. Now it is January 2015 and I am finally getting to this project 🙂 Perfect timing for those that might be considering spring and summer projects – plus we have lived with it for several months so I can tell you how it held up to some pretty nasty storms over the winter.
EDITED: Now it is April 2016 and the project still looks exactly the same. The pictures in this post are updated to reflect how to the pergola still looks over a year later. We did add a TV to the pergola so I will show you how we did that.

This project was pretty awesome. We live in Northern California and the winds here can be incredibly strong plus it gets very hot in summer. We purchased a gazebo several years ago for about $300 and held up for exactly one summer. It was really hard to disassemble so we wound up keeping it up for fall and winter and it took a beating. In late winter I went outside after a nasty wind storm and very literally found the entire gazebo structure in the pool. That was super fun to fish out and I was already unhappy because the gazebo was dark brown and the colors of the fabric had really faded in the sun and just looked shabby. After just a few months- boo!
So we decided a more solid structure was in order. We did request quotes from contractors and looked at some pre-made kits from home improvement stores and discovered it would be about $700 to $2000 for a pergola. Ouch! More then we wanted to spend on this project.
We had discussed just building our own from scratch and one day my husband comes back with the supplies from Home Depot and boom! He was ready to get started :).
So when it was all said and done we spent roughly $400 on materials and it took about 2 days. My husband did most of it by himself and two of those days were weekends so he spent probably 2 almost full days on the project and then a few hours after work on it. Execute your DIY projects properly with professional tools from Mitre 10 Catalogue sales. At least $100 of the budget was sun shades so if you don’t need those, your project will be cheaper.
This project is one of those that seems more complicated or difficult then it really is and doesn’t require tons of fancy tools or special skills.
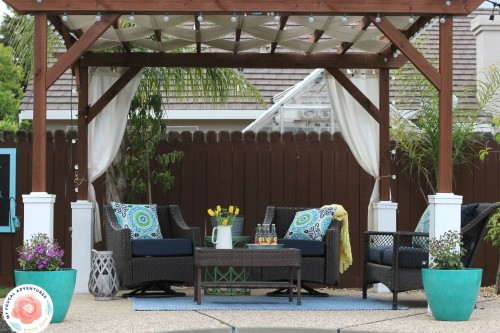
The most important thing about this project is ensuring the structure is very safe and sound and I think we did do that. I can tell you we had a few nasty storms over the winter and the pergola did not budge at all. It still looks really great!
So here are the steps that we took to build the pergola plus a few little extras that we did to snazz our structure up a bit.
Here is the before:
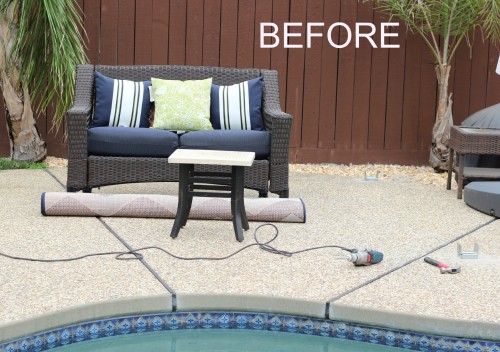
Boring and super ugly concrete and pitiful palm trees- gah!
As I mentioned above the pergola needed to be incredibly strong and secure. It sits in front of the pool and we have kids that climb, jump, pull and hang on everything so delicate is not really an option. Plus the winds in Sacramento are crazy so I didn’t want a pergola flying through the kitchen window one day ;).
Our pergola is a free standing unit but you can build one that is attached to a deck or house very easily.
*Note my husband and I did this entirely ourselves with some minor assistance from our landscape design crew (Adriana 7 years and Maya 5 years). You can totally do this yourself too!
———-Step 1: Design——–
We started by measuring where the structure would go and drafting a rough design. We didn’t want anything too intricate but we still wanted something that looked nice and would stand the test of time- so our design is fairly simple. We also took into consideration building permits. Our structure is small enough to not require a building permit but you might want to check on ordinances in your area before you get started.
You can choose whatever type of lumber you prefer. We used a pressure treated hem-fir lumber that was already stained dark brown. Cedar or pine would also be gorgeous and you can stain it any color that you like. You probably want to use Thompson’s water seal to protect your wood and I would do that before assembling everything.
———-Step 2: Dig it baby!——–
If you are going into the dirt, you will need to dig a hole and use concrete to bury your posts. (Find a more detailed post about how to bury posts in concrete here).
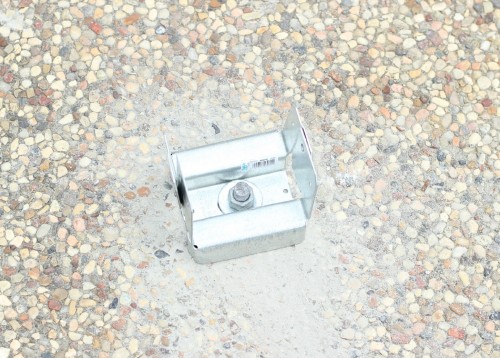
We were going into concrete so we used a rotary hammer and masonry bit and went roughly 4 inches into the concrete.
Next we used 4×4 EZ Bases to secure the posts into the concrete.
We went ahead and started to assemble the structure right where it would stand.
———-Step 3: Build and they will come——–
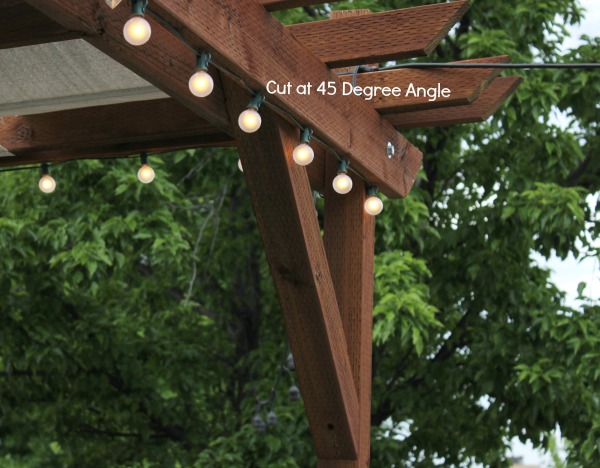
To do this we first attached (4) 2 x 8 x 12 pressure treated studs to (4) 4 x 4 x 10 posts. We drilled holes through the 2×8 and 4×4- using bolts for additional reinforcement. We cut the corners of the 2 x 8 at a 45 degree angle to make it a little more decorative. You can skip this step if you prefer the flush ends. You can see the angled beams in the photo below- it adds a nice touch and is pretty simple to just make the extra cuts on the end.
Once you have your wood frame assembled, push the posts into the EZ Bases.
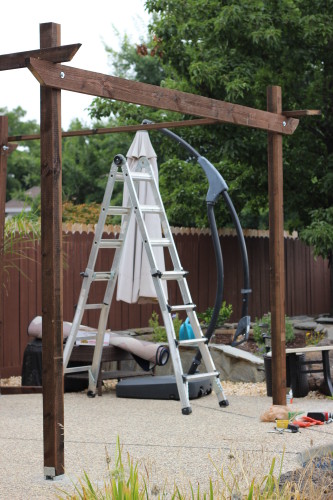
Screw the bases into the posts. We used galvanized screws. I just held the frame up while my husband zipped around to each of the (4) posts and screwed them into place.
We chose to use (11) pressure treated 2 x 4 x 12’s and positioned them evenly across the top of the frame. Once they are evenly spaced on the top, screw them into the frame. We used 4 inch screws to attach the wood to the frame.
You can use fewer beams depending on the look that you want. If you want to grow Jasmine or something on your Pergola- you might want to use more beams so that the space in between is closer together. In cooler climates where you don’t need the shade from the Pergola, you can probably get away with using fewer beams on top.
It is hot as heck in Sacramento and we wanted this structure to serve many different functions- including shade in the summer so we used more beams with the intention of weaving in a sun shade once we finished.
We cut 4 x 4’s into 30 inch pieces at a 45 degree angle using a miter saw. That creates the corner bracing for the pergola. We also screwed those in with 4 inch screws. If you have a Jigsaw you can make even fancier edges.
———-Step 4: I’m So Fancy——–
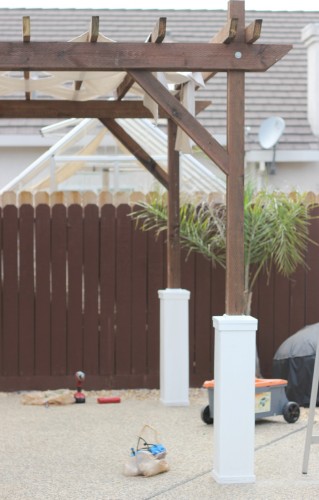
We decided to try and give the pergola a little more of a custom look by adding boxes to the base. We used 2 x 8 x 6 and cut them in half to make them 36 inches tall for the base. We primed and painted the boxes white. You can get very detailed directions on how to make the boxes by clicking the Ana White tutorial here. We actually did not use her tutorial for our project but the end result does look very similar.
Often Pergolas don’t serve any real purpose other than defining an outdoor room. We actually needed ours to offer shade in summer so we added a few more touches. If you don’t need the shade, your project should be even cheaper.
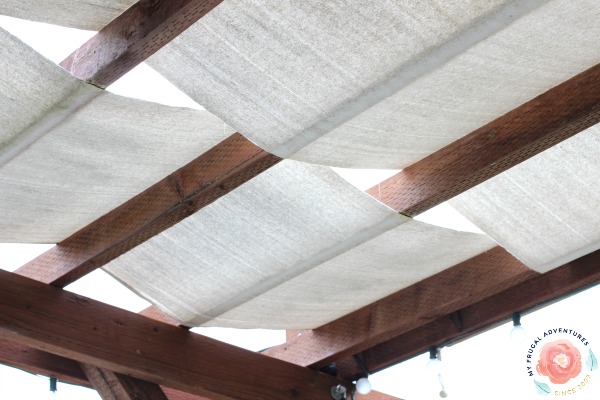
For shade you can go a few different routes. The easiest option is to purchase actual sun shades which are 20 feet long. You should only need about 12 feet so you can either have some hanging over or trim it to the right size. This can kind of add up- we would have needed (4) so $140 or so.
As a cheaper alternative, we took a standard 12 x15 painter’s tarp and cut that into (4) equal strips. Next we treated the tarp by painting equal parts of standard school glue and water all around the sides. You don’t need to do the entire tarp- just about 6 inches in or so from the edges. This will prevent any fraying of the tarp so it is a time consuming but worthwhile step. You can see above the tarp is nice and clean when it is weaved into the top- no little strings and such hanging off the sides. (Update: the following year we did have some tiny strings that needed to be trimmed off. So the school glue does work but a year later there was about 10 minutes of maintenance needed on the tarp in the form of trimming off little strings. Sewing would be the best option if possible.)
We did need to trim the tarp down a bit to exactly the right size – our strips were roughly 2 1/2 feet.
To get a taut finish for the tarp and to ensure it didn’t wind up blowing off the pergola and into the pool, we screwed the tarp into the top of the frame with screws and washers. We used 24 screws so the tarp would be super secure.
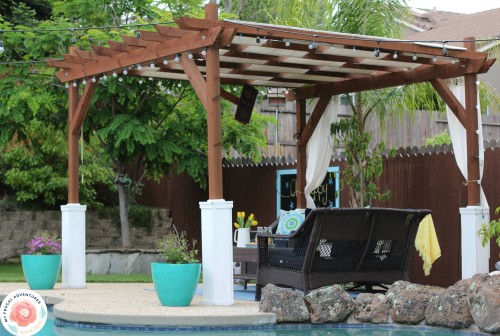
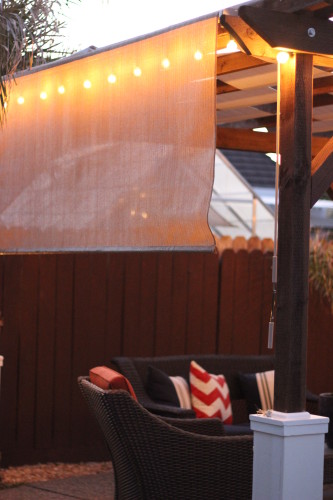
The last two steps were adding a sunshade to one side of the pergola and lights. We got a 6×9 sunshade and attached it to the side and you can crank it up or down to provide additional shade. We live in Sacramento so it gets very hot in summer and the extra bit of shade is really worth it. This year we want to add more privacy to the backyard so we might add another sun shade to the back of the pergola or we might add some larger trees against the fence.
And the very last step was adding globe lights all around the base– they look so gorgeous at night! Ours twinkle in the pool water and look so peaceful- I highly recommend these for beautiful ambiance at night.
So that was last summer’s project! This summer I can’t wait to replace our old fence with a brand new one and I will get some updated pictures of the pergola a year later with (hopefully) a gorgeous new fence around it.
Here are a few more pictures of the finished product– please excuse our sad old fence and the neighbors about 2 inches away (welcome to California!)
Sunshade cranked down a bit- it actually goes almost down to the ground.
And the later addition of the TV:
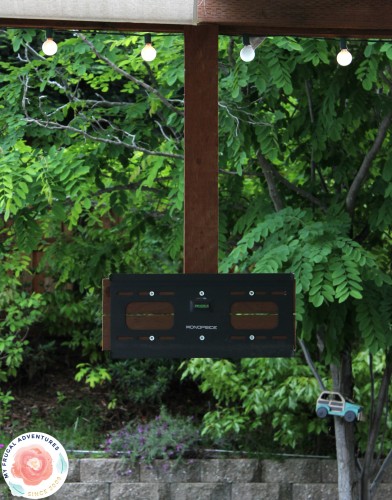
We actually added this little detail very quickly late last summer when there were a few big soccer games on TV. We invited some friends over to watch the games and wanted to entertain outside so my husband quickly added this T-Shape with a flat screen tv mount (similar to this one.)
We have an extra flat screen in the guest room that gets moved outside when we want to have movie night or friends over and then back inside when we are done.

I want to mention my husband works for a broadband company so he is very comfortable with all this stuff and very quick at hooking things up and whatnot. We have power at our pool pump (located just past the post on the left side of the pergola in the photo above) so we can just bring a cable box outside and the TV plays anything. If you want to have TV or movies here are three options- consult your local cable provider and see if they can wire your outdoor space, some cable companies offer wireless receivers that would be very easy to move in and out, and a third option would be a Roku or other streaming device to just play movies. If we had a larger yard space I would look into one of these projectors too and maybe consider that to project movies onto the fence or onto the sun screen that pulls down on the side of the pergola.

Let me know if you decide to tackle a DIY pergola this summer! I’d love to hear how yours works out!
And if you like this post, you might also like:
How to Build Shutters (in 15 minutes!)

How to Start a Vegetable Garden
Looks great! I’d love to build one in our backyard…but never thought it was possible for DIY.
I LOVE. LOVE. LOVE this post. Your pergola is BEAUTIFUL. So beautiful and crazy cost effective. What a great place to enjoy coffee in the morning or wine at night!!
Awsome! It looks beautiful! This is exactly what we need on our huge deck. We live in Ohio so it has to stand up to heat…nasty summer storms…and brutal brutal cold winters. ( its a balmy 5 degrees right now!) This looks perfect.
Nice job! Our house already had a Pergola when we moved in but a few weeks ago my husband and I put the sun shades on it. We have been wanting to do it for 4 years now. It will work great for when it does rain, if the rain ever does come!!:).
Yeah no kidding Sara 🙂
Oh brrrrr Dodi!! It is 63 in CA and I was thinking that was pretty cold. 🙂
that looks amazing! i am sure you enjoyed many a nice day out there. we put a patio in last summer (instead of just a table and chairs on the lawn which we had to move every week to mow around) and i would love to have this in our space. thanks for sharing this. finally. 🙂
b
Thank you so much for writing this post. I’ve been wanting to build a pergola since last summer, but had only ever found one other post about it. THANK YOU THANK YOU THANK YOU FOR THIS POST!
I live in Roseville, can you tell me where I can go to buy the same wood that you used?
What tools will I need to complete this project? I’ll need to go out and buy them, but I don’t mind since tools are an investment that eventually pays for themselves.
Hi Tina,
It depends if you go into the dirt or concrete. We used a roto-hammer for the concrete- I believe you can rent those and then basically a drill. If you want the special edges like we cut for the top planks of wood that was just a miter saw. You could take measurements in to Home Depot and they will cut it for you. I believe we bought the wood at Lowe’s on Fairway last summer. It could have been Home Depot but I think it was Lowe’s.
My husband and I have been doing the same as you did, looking at various plans and kits for pergolas. Your directions sound so much easier. I didn’t notice that you said approx. how much you spent, would you mind sharing? Also, how long did it take you and did you need extra help? we have bought a gazebo a number of times for our patio area, as they haven’t lasted, but is getting expensive. We would like something that last longer than a few years. Your info would be much appreciated.
Hi Cathy- my husband did the majority of the work and I helped a bit here and there. Plus our kids “helped” cough… got in the way 😉
I was intimidated by the project but as long as you are very careful with securing the structure properly into the Earth, it is actually not that hard to do.
Here was our budget:
So when it was all said and done we spent roughly $400 on materials and it took about 2 days. My husband did most of it by himself and two of those days were weekends so he spent probably 2 almost full days on the project and then a few hours after work on it. At least $100 of the budget was sun shades so if you don’t need those, your project will be cheaper.
HTH!
Wish I had seen this a year ago lol thanks for the step by step, we build one attached to the front of our house for a porch feel…love love love it
omg, this looks amazing!! And totally do-able! Thank u so much! I live in Sac too =) I hope to tackle this project this spring!
This looks amazing. You’ve inspired me and now I’m wondering if it will be possible for us to build a pergola/cover for our deck.
Since you’ve completed the pergola, have you noticed any sagging of the 2×4 rafters? We’ve begun this project, but haven’t decided to use 2x4s or 1×6 decking boards. They would span 10ft, so we were concerned about future sagging.
Hi Rachel- No we have not had that issue at all a year later. It looks exactly the same as the picture including the tarp we made last year 🙂 This year I trimmed off a few strands of string that were hanging but that was about it. California is a reasonably mild climate though- so no heavy snows and we don’t get a lot of rain- OK any rain basically- but the winds are really something else and the pergola stood up to them.
Great post! I didn’t notice you mentioning the dimensions of y our pergola. Also, do you find that rain collects in the cloth you have on top requiring you to use something to get the water out? Also, does the seating area underneath stay dry in rain?
Thanks!
Courtney- The furniture is outdoor furniture so it was made for the elements. The cloth on top shields it from most sun damage and a little from rain but those pieces do get wet in a storm as it isn’t enclosed. We live in California so there isn’t a significant amount of rain or snow to be concerned with but we have had a few nasty storms. No we haven’t found that rain collects on top of the fabric. It is not a taut piece of fabric so the rain just slides right off.
Felicitaciones!!!!!!!!!!!!!!, hermoso trabajo, ojalá pueda hacerla en breve, saludos desde Santa Fe, argentina, muy interesante ésta página.
WOW!!!! really a nice job. Bothe of you did a GREAT JOB!!!
So sweet thank you very much Debbie!
HI!! This looks wonderful. I’m planning on building my own in the next few weeks using your instructions. If you don’t mind, what are the dimensions of your pergola. Thanks again for sharing this wonderful information!!! 😀
Elizabeth, the boards we used are 12 x 12 so the pergola is 10 x 10 size to allow a little overlap on the sides. HTH!
LOVE this! I have been wanting one or even two pergolas in our backyard for forever. The sun is brutal here on the gulf coast of central FL, but buying a pergola is SO expensive. Your post gives me hope :-). Thanks for sharing.
Oh awesome Rebecca! If you give it a shot, come back and let me know how things turn out!
Since you mentioned how windy it is, how do you keep the sunshade from blowing around when it is pulled down? Just curious, because we would like to implement this idea. Thanks!
Hi lc- That isn’t an issue I have noticed because we put the shade up when not in use. It is windy in the winter or during storms and such and we don’t use the pergola much during that time of year. The main point of the sunshade is to block sun and we don’t get those tropical storms here like you might see in say Florida where it is sunny and windy at the same time. Our weather is overall fairly mild year round in California and during the winter we just put the shade up for most of the season.
we have just finished a canvas covering for a pergola attached to house..however ,the rain is not ” flowing” off as planned…we have made slight difference from house to edge of pergola,thinking that would help with the drainage…now thinking a rod in the middle of each panel( there are two 6×12) from from house to edge…anyone have problems with rain?
Gloria, did you do cut canvas in strips as we did? If you have a flat canvas and live in an area with significant rain I am sure you will need to plan a little differently.
Looks nice. But I would never use pressure treated wood where someone may grab it. A splinter from pressure treated wood can be very dangerous. Also the article suggests that you could put your posts in the concrete. But if you want your posts to last I would use a post base that’s keeps the post off the ground. Once again. Looks good. But do your research.
Hi Taylor, Thanks for sharing your thoughts! Pressure treated wood is commonly used on play structures, decks, fences, picnic tables and other outdoor structures. I have read information from the EPA that states there is no reason to not use it at this time. You do need to take care with it though for sure! I probably wouldn’t use this on a picnic table or even a bench that would have a lot of contact. For our family, the benefits of the pressure treated wood outweighed the cons in the pergola. The children don’t climb on this and we don’t rub the sides of the pergola so we aren’t too concerned with a lot of contact on the wood. I think if pressure treated wood is a concern for your family, you can certainly look into the alternatives like plastic or metal for sure. Also we did use a post base on the pergola.
If you have alternate plans for building a pergola that you would like to share please feel free to do so!
Great tutorial! Could you explain the globe lights? Are they strips of globe lights that plug in or is it something I’ll need an electrician for?
Hi Sonya, Just string lights I purchased at Costco that we hung up. Like Christmas lights 🙂 No electrician needed.
Great post! You mentioned using 4″ screws to attach the 2″ x 4″s to the frame. How did you do this? 4″ screws aren’t long enough to go through a 2″ x 4″. Did you drill in an angle from both sides of the 2″ x 4″s?
Good question Alex, I should clarify that. So the next size up in screws were really long so we stuck with 4 inch and even some 3 inch. We just predrilled holes about halfway into the 2×4 so the screw has a 1-2 inch headstart. Does that make sense?
How did you attach your curtain that you have hanging in the back?