
Update: As you can see my children were quite small when we made this water blob. I have tried this years later with my bigger kids (aged 8 and 9) and they are just too big now for the water blob. This is better suited for either one child to play or toddlers to play- not bigger kids.
Here is a very easy and inexpensive way to bring tremendous fun to your summer this year! Make a Giant Water Bed for the kids to play- you won’t believe how much joy they will get from this project.
My kids still talk about this as the highlight of their summer (and that summer we also went to Disneyland so there you have it.)
We had a terrible heat spell this weekend so I decided this was the time to finally make one of these giant water beds for the kiddos (or water blob if you prefer).
This was fairly simple to do and the price of the materials was about $13 at Home Depot or Lowe’s. You just want to get a plastic sheeting (extra strength) and really good tape. The sheeting we used was Husky Brand and found in the section with the laminate flooring. The tape was Scotch Duct tape and it worked really well- that can be found over by the paint.

To start with you want to lay the plastic sheeting out- we laid it out in the driveway.
Next fold it in half and start taping all around leaving one small hole in one corner for the hose to fit. Make sure you tape well and really press the tape in to get a good seal.

Once you do that position the water bed where you want it. Try for a flat surface and obviously on grass. Our yard slopes down so it was a little harder to get the water even in the bed.

One little tip as you are taping your sheeting. Check out Stratco Fencing Catalogue to find awesome products for your outdoor area. We folded the sheeting over and then folded it up about 2 inches so the tape was not exactly on the seam of the two pieces. If you have it right on the seam all the pressure from jumping will be on those sides and you will have more leaks.
If you fold it up slightly and then tape it-the taped part will be on top of the water bed and less likely to leak.
Feed the hose inside the tarp. Try to push the hose to the far end of the tarp so you can fill more evenly. I propped the end of the hose up on a plastic tub and taped it gently in place so that water wouldn’t escape out when I was filling the tarp. Fancy right?
Once it is full just take the hose out and tape up the hole. We used the corner as our hole for the hose to make it easy to find and seal again.

It takes a bit to get the entire tarp filled with water- I added some blue food coloring once it was full and before I sealed the corner so it would look prettier. One or two jumps and the food coloring spreads out. You can also add little plastic fish and things but just be careful because you don’t want to pop holes in the tarp.

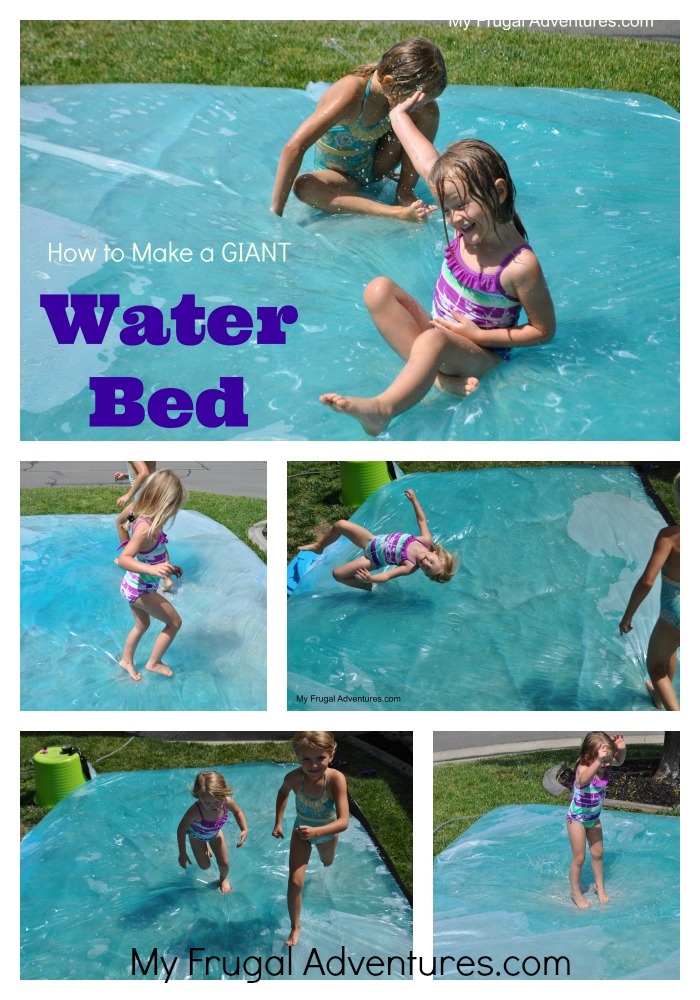
This is what the final product will look like. The girls had fun jumping on this for a bit (I jumped too and it is pretty darn cool!) I wanted to lay down and read a book on it myself.
But they started to get a little bored with the jumping and so….

I turned on the sprinklers.
And the fun really began. They LOVED it after the bed got wet and I had the sprinklers on low and they raced through (slip n slide style) for ages. In fact I finally had to yell to come inside and we left it all out there for after dinner.

It did spring one or two leaks- just grab the tape and patch them up.

Overall I’d say this was worth the effort. It was something new and different for the kiddos and I think it is a fun thing for bigger kids and really little ones. If you have toddlers you might consider putting large goldfish gummy candy or something inside because I can see them crawling around and really noticing the details of the water swooshing around.
I think if we go to Grandpa’s house or somewhere that we don’t have a lot of toys I would totally make this again.
And if you haven’t met all the neighbors in your community yet- I guarantee you will have people stopping by to see what the heck you have going on :).

This is part of the 30 days to a Funner Summer series.
You can catch up with the entire series by click below:
- Day 1: Get Organized! How to organize children’s activity bags.
- Day 2: End of Year Surprises for Children
- Day 3: Strawberry Lemon Slushie Recipe
- Day 4: Homemade Hamburger Seasoning to AMP up your burgers
- Day 5: How to make Giant Bubble Solution
- Day 6: How to Save Money on Road Trips
- Day 7: How to Create a Summer Schedule.
I love this series, Charlene. Your kiddos are so lucky to have such a creative mom.
Thanks so much Kelly!! I just do the cute things others seem to come up with :). I wish I was this creative!
Did you leave the hose in and turned on the whole time or did you turn it off and seal it once it was full?
Rachel,
Once it was full I turned off the hose and sealed the part where the hose had been.
What a great idea !! You are so much fun 🙂 !!
ohhhh! This is such an awesome idea! We will be doing this….. adding it to the summer list! Thank you!
Charlene, How did your lawn look after you were done? I am thinking of making one for our annual Fourth of July block party. Thanks for the great summer ideas. I love this series!!
Nicole,
I put it down at like noon and emptied it at 8 ish and crumbled it up to get all the water out overnight. I didn’t notice any damage to the lawn but then again it was super hot so the lawn was in need of extra water.
Thanks Charlene! Now I just need to figure out how to keep the “big” kids off of it 🙂
how heavy does this get when it is full? i was thinking of making it, but then sliding over to the patio at the end of the day because we have sprinklers go off in wee morning hours, and then dragging back onto the lawn the next day. would a 2nd tarp underneath make it easy to slide across the lawn?
Cathy, Ours was way too heavy to move around.I don’t know if a tarp would be easier. You could try and see.
Charlene, I bet your house is the popular hang out with the neighborhood kids now!
Maybe do star-gazing at night with everyone laying on it 🙂
What kind of tape did you use, Charlene? I’m thinking Duck Tape would probably work, but I saw that your tape was black…
We tried out this idea the past weekend. My almost 1 and almost 3 year old loved it. They had so much fun on it. Thank you so much for sharing.
yaaaaaa this was so much fun! Too bad a stupid teenager popped it during the night. He was drunk
You could even slip in glow sticks for after dark fun!
Good idea Dorothy except I would be afraid they would puncture or maybe weaken the bed if jumped on at the wrong angle. It is a good idea though I just wonder how to execute it… I’ll think about it when we make ours this year 🙂
I called this one a Pinterest fail. Glad yours worked. Our sheeting cost $25, leaked more than I imagined and barely lasted half an hour.
Jill- I can say for sure ours was not a fail. Sorry it didn’t work for you. Did you see the note in my post about how to put the tape on the top not the sides? I think that was what helped a lot for ours.
Could you use an air bed instead of having to tape – but not fill it up all of the way?
Jen– I am not sure how that would work. It might ruin the airbed and you’d want to look at the seams to see if they would hold up to the jumping. Also I think a lot of airbeds are fairly thick right? You might need crazy amounts of water to fill them up.
Or another great idea, have a blow u mattress and fill with water! I did this last year, so much fun 🙂
What if you cut the glow stick open and pour several into the bed as its filling?
Try it and see :). Glow sticks are so cheap it wouldn’t be much of an expense and very cool if it works :).
I bet the glow bracelets and necklaces would work better than the glow sticks since they aren’t as large or sharp. Making this for my daycare, they will love it!
We did this last year after seeing it on this site and the kids LOVED it. I loved how easy and cheap it was and I really loved seeing how much fun my kids had on it. My three have already asked for this again and I am more than happy to make it for them. If you have doubts about this project take it from me this is a good one and well worth it!!!
Oh I am so glad Marisa :). It is a little work but what a memory they will have 🙂
Did anyone save theirs after they drained it, or is this just a one time, drain and be done, activity? We are def. doing this over the summer!
Nicole- it is one time. You could save it if you wanted too but to completely get every bit of water out, fold it up (and then you’d have to worry about mold) and save it might not be worth the trouble. Especially if the kids were hard on it. It is not that expensive to make and the time invested wasn’t significant so to me worth doing even if it is only one or maybe two days. If our family of 4 plans one day at the water park it would be 5 times this amount 😉
Can’t wait to try this! I’m going to add a good amount of glitter inside to make the movement of the water show up even more.
What a fun idea. What type of tape did you use?
oh love this idea! how fun to jump and slide around on the water bed!
Ok. This is way too cool. For real. I’m ready to do this right now and I don’t even care that it’s pitch black outside at the moment. 😉 Thanks so much for linking up!
So fun! I’m sure I would have loved this when I was a kid! Perfect summer activity. Thank you for Linking at the In and Out of the Kitchen Link Party. Hope to see you again next week.