
My husband and I tend to tinker around the house pretty much every weekend really. We are home improvement junkies and there have been a few projects we have done that really made a remarkable difference. You know those little projects that get buried on the to do list and once you do them, you kick yourself for not doing it sooner?
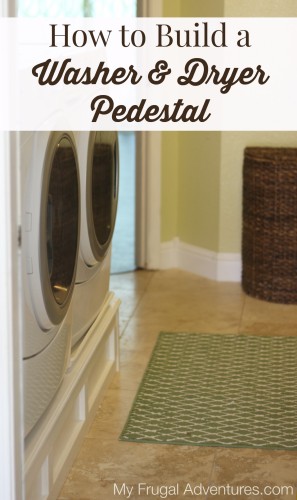
Well this is another one of those projects! If you have front load machines and you don’t have the little pedestals for underneath, I can’t even begin to tell you what a difference it makes. We bought HE machines a few years ago and when it came time to shell out the $350 per pedestal to elevate the washer and dryer we decided to skip it. Really that just seemed ridiculous to me to spend so much and I have never found a super great deal on pedestals that match our washer and dryer.
So I wanted to build a pedestal because crouching over to do laundry is just annoying. Also we have a plastic sheet thing under the washer to protect the floors in case of a leak. That thing gets so dirty with the dog door right next to it and the garage door goes into the laundry room- so it is a super high traffic area in our home. The laundry room is actually the first thing you see when you come in through the garage so I wanted to finally get this project done.
Now my husband is pretty handy and this was such a fast project. The actual construction of this project took about 2 hours or so and then there is a little lag time for painting. And the cost breakdown worked out to be about $80 in materials. So $80 for a nice finished look vs. $700 for the normal pedestals. #YesPlease
Here is what we did. We started with some basic plans from Family Handyman.
We made a few adjustments to the plan- first we made the pedestal several inches longer then the dryer and washer because we also have a trash can in the laundry room and I thought it would look cleaner and nicer elevated. Plus I like the idea of the pedestal running straight into the wall to make cleaning the floors easier.
You can see below the corner of the trash can- depending on your space, you might also make yours long enough to accommodate your pet food containers or laundry baskets or totes to hold supplies etc…
I have seen plans to make a pedestal with storage underneath – either sliding drawers or baskets. We decided not to do this because as I mentioned, it is a high traffic room and those little cubbies under the washer and dryer seem like they would be a nightmare to clean. I can just imagine myself on my hands and knees with the Dustbuster trying to get into the corners and behind baskets. So this pedestal is completely enclosed.
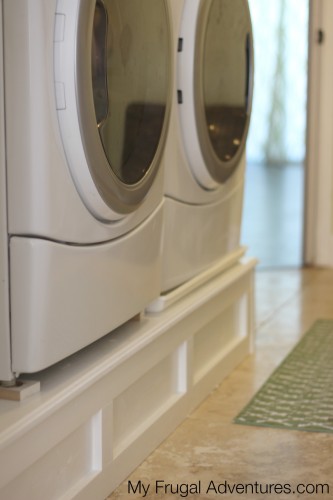
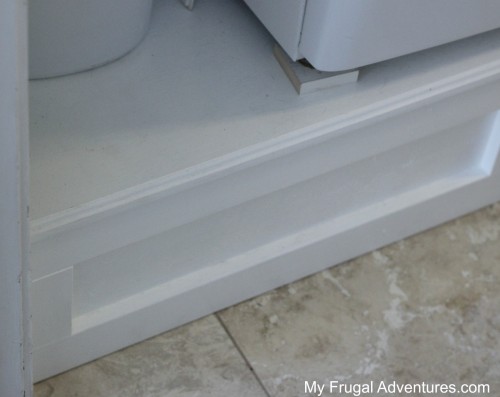
Now the washer has the little plastic tray thing under to protect just in case it ever leaks. And then the dryer is elevated just a tiny bit on extra wood pieces just to protect the pedestal from getting all scratched up. From this angle you can see those things but from a normal standing view you don’t see them at all.

So you can get the measurements and basic instructions from Family Handyman above, but let me walk you through the modifications we made.
We started assembling the base in the laundry room. This thing is pretty big so rather then building it in the garage and trying to move it into the laundry room, we just built almost the entire thing in the laundry room.
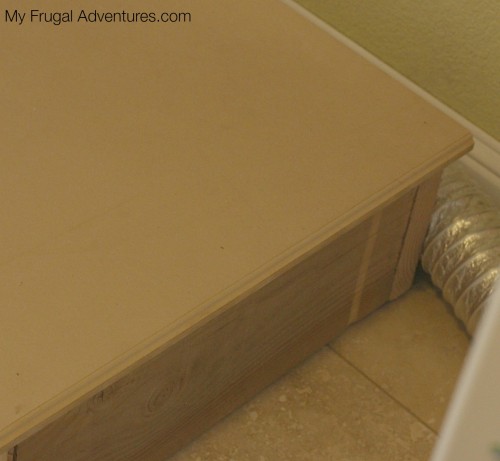
Family Handyman calls for 1/2″ plywood for the top of the box but we used 3/4″ MDF instead. Our MDF was an extra inch on all sides and then we used a router to shape the edges. This is just decorative and a step that can be easily skipped if you want just a plain box. Another option would be to buy decorative trim and use that all around the top edge. Here is a close up of what the top looked like before we painted it.
Oh and one important note when you are building the box, Family Handyman recommends using one joist in the center of the pedestal. We actually did two joists in the center of ours so that it would be super stable.
Once the box was built we added some decorative trim as you can see above. Then we painted the entire thing white with three coats of paint + primer.
And that was it! Not too difficult and really my husband had this done before I could even get the camera out to snap some pictures.
We have had this up and running for a few weeks now and it is sturdy and stable and awesome! The washer and dryer don’t move at all and I can’t tell you how happy it makes me to come in the door now.
Before I would see the washer and dryer plunked down on the ground and the floor always seemed dirty to me and the plastic thingy (seriously I hate that thing!) always looked gross… Now the white pedestal makes the room feel so airy and clean and fresh and open. It really is a dramatic difference.
If you have any questions or need clarification on how to make your own pedestal, please feel free to ask below. I will do my best to help!
And here are a few other projects you might want to check out:
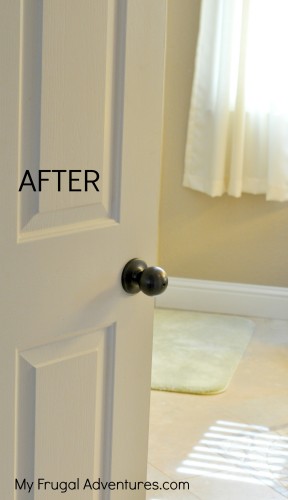
Easy DIY Spray Painted Doorknobs— we changed ours from the tacky brass to a bronze color and I love it.
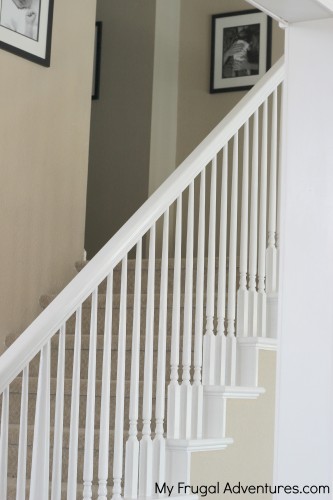
How to Paint Star Railings- again I loved this project. The stairs went from builder grade oak to a fresh and clean white.
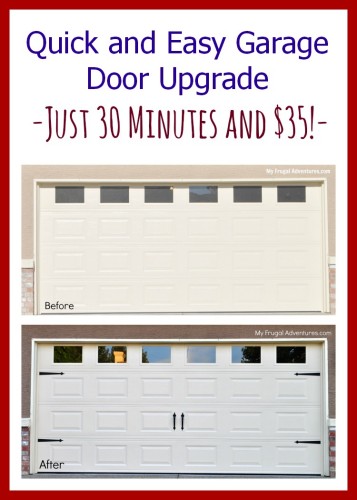
Upgrade your garage door in just a few minutes. Super simple project that makes a big difference.
What a great project! I’ve gotta think about this though. Our laundry room is upstairs and not only do we have a pan, but a drain in case we have a leak. Although I’m sure my husband is perfectly capable of extending that pipe to the top of the box. I’m with you though on the cost of those dang pedistals!
Nice Job! What caught my eye is the “tinfoil” exhaust tube for the dryer–those will burn if the lint catches fire. Take a look on You Tube for some dramatic fires. I used to have one until someone alerted me to it, so now I have the metal tube. Pls be careful!
OK Joann I certainly will look into that. Thanks for the tip!
Nice! Can you tell me how hard it was to get the washer and dryer up there, and how you did it without scratching the paint? Thanks!
Sally- we did not scratch the paint but it was not easy! My husband picked up the dryer and got it up there himself. For the washer we used a plank of wood set diagonally on the pedestal. We put an old junky towel under the plank. We just pushed and pulled and shimmied side to side and finally got the washer on top of the towel. Then my husband picked up one corner of the washer and I yanked the heck out of the towel and it did rip and got tossed. Next he picked up one corner of the washer at a time and I shoved the plastic tray thing under. 🙂 I should have taped that process- it was not easy and was pretty comical.
Great project! One thought though-my husband used to do appliance repair, and he commented that being on a pedestal would aggravate their need to be level. The higher off the ground the load is, the greater the potential for imbalance is. This can be a problem b/c the claim to fame in front load washers is that they spin so fast to get the water out. If unbalanced, the spin cycle drags more, uses more energy than it saves, and puts greater strain on the motor, leading to inefficiency. This is one reason we don’t have front loaders, although I’m with everyone that they greatly save your back! Nice looking pedestal box you guys made.
Carolyn, I am sure he is totally correct with his analysis but they actually sell pedestals to go with the washing machine in the store. The pedestals are specific to your type of washer and dryer because they screw into place. So they must have figured out a way to make it work or they wouldn’t sell the pedestal as an accessory piece with the washer and dryer 🙂
Looks great! How did you secure the machines to the pedestals? Or are they just sitting on it? And did your husband simply nail all pieces together? Any problems getting the pedestal to be level? I hear a lot of floors are not (due to drainage, error, etc). I want to try this but have no major tools… No nail gun, no router, etc. it’d have to be pretty raw… Hammer, nails, sand paper, paint. Is that possible? I know not fancy.
Hi Vanexsa- the base of the pedestal is very stable. We have done innumerable loads of laundry with no problems. They just rest on top. We do have tile floors and while the floors aren’t perfectly level, they are pretty level so we didn’t really have any issues with that.
Hello! Found this on Pinterest and will pin it for when and if we ever get front loaders! I do wonder though, would adding some caulk to the bottom of the stand where it meets the ground help keep cleaning easier? I’m just imaging leaves and dirt getting wedged under the pedestal! It might be much easier to keep tidy if the crack was sealed off!
Thanks for the post!
Hi Stephanie- we have not had that issue. The gap is not large enough to let debris in- for sure not leaves and it is right by the door. You can certainly caulk if you like. The weight of the washing machine and dryer keep the space between the pedestal and the floor very small.
Why would you want or need one of those? Can’t you just save money, not make it, and put the washer/drier on the floor?
Hi Lynette,
Yes you can put them on the floor. I love how it looks and we do so much laundry- it is really nice to have our machines up a bit higher so I don’t have to crouch down all the time to see inside.
This was a great project for our family but if it isn’t for you that is OK too. 🙂
Hi,
Nice project. Does the side tie into the wall. or just run up to the baseboard?
Hi Gary- you could certainly build it up the wall. We didn’t want anything permanent so ours rests against the wall but isn’t mounted to it.
Hi. Nice laundry Pedestal. I just have one question about the leg securing. How and what did you make to secure the washer from falling off it (in case of a wobbly load). Thanks in advance for your reply.
Bharat
Bharat, we have had tons and tons of wobbly loads and never an issue with the washer falling off 🙂 I do stop the cycle if it seems particularly loud and rebalancing the laundry inside usually does the trick.
Would you mind giving suggestions on how to lift the washer onto the wooden pedestal?
Thanks
Hi Sri. We struggled with that too. I think we wound up creating a ramp with extra wood and just yanked and pushed and yanked and pushed. We actually bought a new washer and dryer not too long ago and the delivery people got it up.
Good luck,
Do you have any issues with noise? Or shaking? I was thinking of incorporating the pedestal into the floor and tiling it since I’m in the midst of a huge renovation. How do you think that would work ? Thanks! Wish I was handy! I’ll be giving this article to my GC!
No I don’t have any noise issues or shaking issues. It is very stable 🙂