

This has been the latest project in our home- painting the old builder grade oak stairwells and railings. This was a lot of work but it was a pretty cheap project and the difference is remarkable.
If you have even considered this project in your own home, I really can’t recommend it highly enough. My husband and I have been marveling all week at what a dramatic transformation this was in our house.
So I am not a painting expert by any means but I will outline the time and budget involved for you below plus lots of pictures so you can see the difference!
We did initially contact a professional painting service to see that the cost would be. If you just have one stairwell this might be totally worth it. For us, there is a stairwell, plus a section in the dining room and another section in the kitchen and the bids were coming in at about $700. We wound up doing it ourselves for less then $100 (and a lot of time!)
But first to see where we got started:
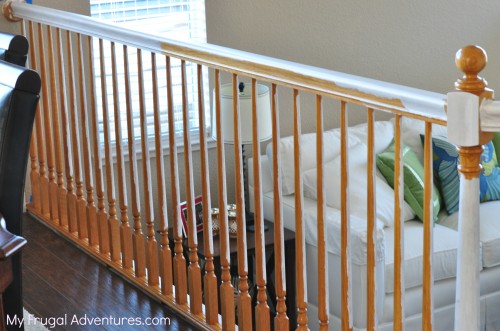
We had this (what I consider) grody oak all over the house. We have already painted all the cabinets and and redid the kitchen but we still have the railings on the stairs and then a set of railings in the dining room and the kitchen.
The carpet is brand new and once we got that in the oak against the brown carpet with the brown walls just looked awful. So this project came to the front of our things to do (plus we had a rainy patch in California and we were stuck inside anyway.)
My husband and I have been negotiating these railings for like 2 years now. He really wanted to get the iron balusters like these:
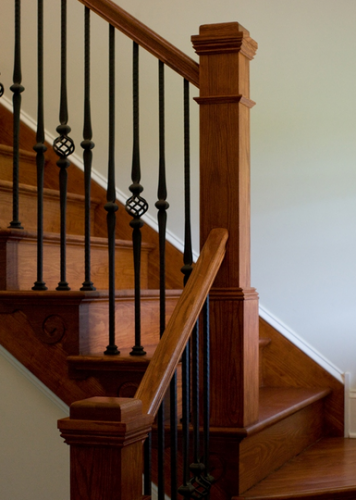
Photo Source
These are lovely and you can actually purchase them from the home improvement stores. One of the big advantages is that these take a good portion of the painting away from you since they simply pop in and out of your railings.
The drawback is that they are about $5-10 each to purchase and we calculated the cost to be roughly $750 which is a lot more then I wanted to spend. Plus these really don’t match the traditional style of our home so I finally won the battle.
Next we had to decide if we wanted to paint or stain. Initially my plan was to stain the top portion of the railings an espresso color and then do the inside of the railing white. Like this:
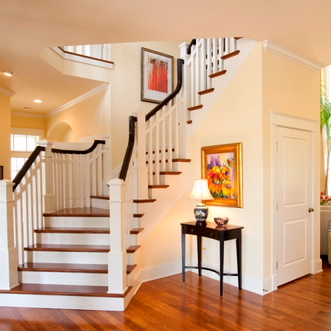
Photo source
I do love this look but then we got to thinking that adding that little extra touch would really add a lot more work onto the project. Plus finding the right color of stain is challenging and on top of that our walls are brown and we have brown carpet and my husband has been calling the house our brown on brown on brown box lately 😉 .
So we decided on just a classic white. Simple. Fresh and clean.
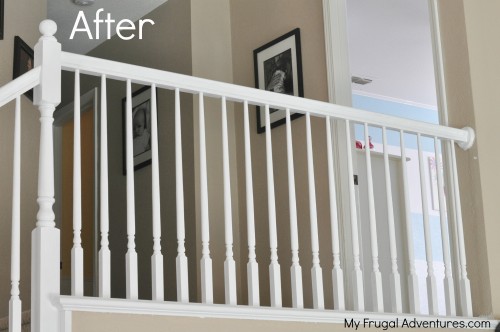
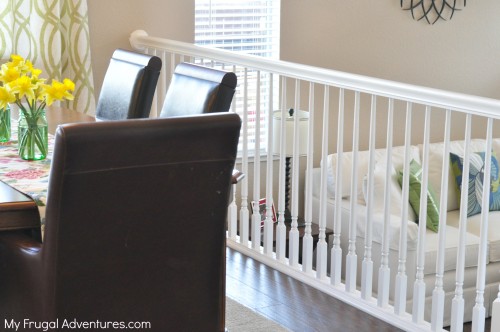
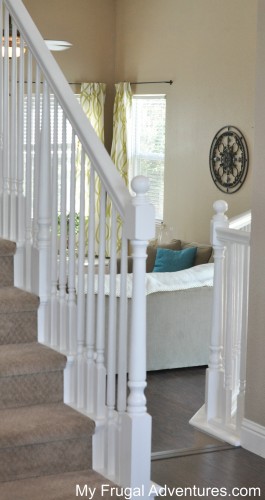
And now for the finished product:
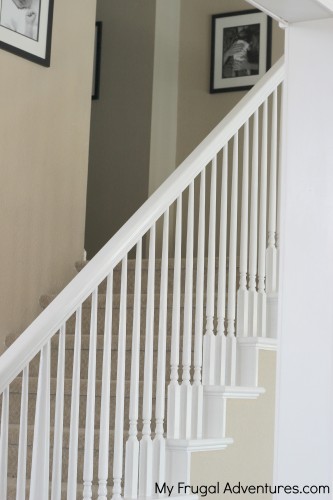
It is light and bright and we are so happy we decided to do this project!
Now for a breakdown of the materials we used:
- 1 can Killz Low Odor White Premium Primer – this stuff is brutal if you don’t get the low odor $21
- Approx. 2 rolls of painters tape $10
- 1 Mini Roller for trim $7
- Wooster Paint Brushes 3 x $7 each
- I can Behr paint- about $25? Maybe less.
And then a few misc things like replacement balusters for a few that were broken etc…
So less then $100 total for this project.
And as for the process- here is what we did. I read a few tutorials about painting railings and one that I read had suggested sanding down the railings, using 2 coats of primer and up to 5 coats of paint.
Um. No thanks.
That is probably the right way to do it but seriously had we done that it would have taken a month to be finished (or more!) #Aintgottimeforthat
So what we did is one coat of heavy duty primer- I used Killz which is serious stuff- and then 2 coats of paint.
You probably should sand down all the railings first but I hate sanding so I didn’t :p. I think our stairs look perfectly nice without doing it.
To do it properly though I would suggest using an electric sander on as much as you can and then hand sanding the rest that you can’t reach with the electric sander.
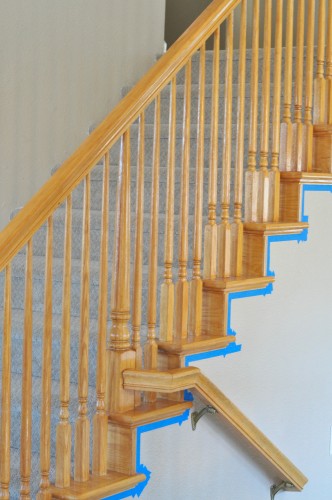
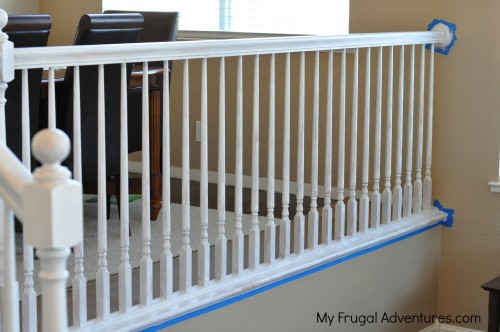
So we started by taping off all the stairs and railings with painters tape.
Next I wiped down everything to get it all clean (seriously some parts of the railings were really nasty.) I just used cleaning wipes because there was so much to do. If you have sanded everything it is important to clean the railings a few times to be sure you don’t have any little dust bits and such left on the wood. If you paint over that it won’t look pretty and smooth so you might want to wipe a few times with a microfiber rag (I get them at the Dollar Store).
Once that dried we started with the first coat of primer.
I think you will probably get a rhythm down once you start. I used a 1 inch Wooster brush– these are more expensive but it is very important to buy good brushes or you will get brush lines in your paint and not that smooth clean surface.
You want to start with the underside of the top railing. Since you can’t see that I just did the one coat of primer and it was enough. You might need one coat of primer and then paint just depending on your railing.
Next we did the top of the railing– where you hold your hand to walk. I decided to do that part next just in case there were any drips so we could see them right away.
Then we did the actual balusters (the inside part) and last the bottom part. You really have to use very little paint on your brush because any drips are bad news. You want to clean those up right away.
We actually painted one side of the railing and then the next day did the next side.
This is not so much a strategy for paint as much as just a matter of time management.
This project took us about 2 weeks to finish. Between the 3 coats of paint, taping etc… it was roughly two weeks of working a few hours a day. My husband and I both work full time and we have 2 small children so we can usually spare 1-3 hours at most per day and then the children are setting the house on fire or someone is painting the dogs nails on the brand new bedspread or other calamities are likely to occur.
I think you probably want to wait at least 24 hours between each coat to really make sure it dries properly- that was clearly not an issue for us.
You can see on the photo above- I found it easier to paint one side (so I was finished on the side where that white sofa is) and then I plunked myself down on the other side to get the back part of the railing.
My husband used some little trim roller brushes he found at the home improvement stores and I preferred to just use an angled brush.
A few other little tips– did I already mention to watch for drips? If you do get a few dried on drips you have to sand those guys down and paint again so I checked myself and rechecked myself on each section that I painted.
We also just got new carpeting on the stairwell so my wonderful husband was meticulous about painting on the stairs. It took him ages and he actually used a small craft brush for the wood base that touches the carpet. Not one single drop though on the carpet ;).
We also installed our own laminate wood flooring several months ago so we had a gap between the flooring and the railing in the dining room. We just added a little extra trim and no worries there. Most people won’t have that issue unless you are doing new floors as well.
Here is what it looked like after just one coat of primer:
And then a few more before and afters:
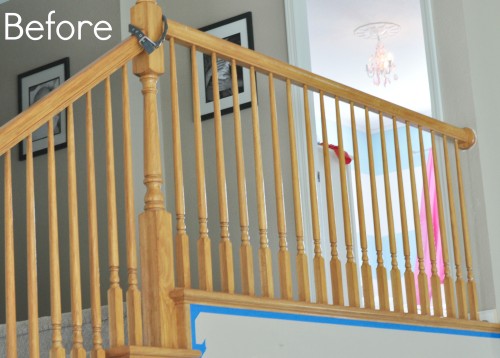
Here is the top of the stairs before… (why yes that is the dog’s collar on the banister. Don’t you have one there too?)
And the dining room:
And going up the stairs:
So again I hope you will consider this if you have the same builder grade railings in your home. I am really thrilled with this. Oh and one last note– we talked to the guys in the paint department and they suggested skipping an sort of seal on the paint. They mentioned there would be a slight chance of yellowing if we did that so better to just have occasional touch ups with the white paint.
And now we are on to the next project!
Here are a few other easy, peasy DIY projects you might be interested in:

Update old doorknobs— so easy and so cheap!
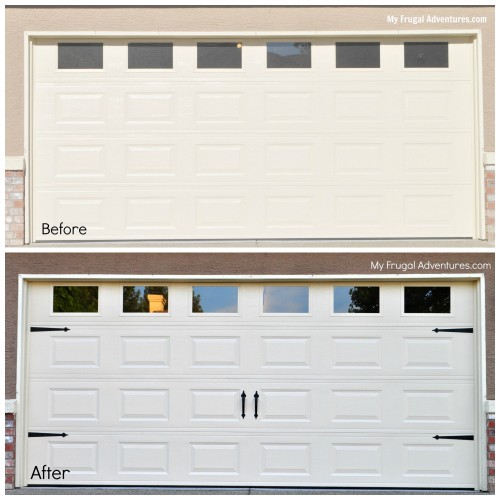
Upgrade your garage door for about $20!
Well done! I don’t think my husband and I can do it by ourselves but I like to read DIY home projects! It’s always inspiring:)
Sure you can! :). I am not gifted in any way so if I can do it I bet you can too!
Wow, what a difference that makes! Whats even cooler is that I think I have the same model, so this makes it so easy to envision what it’ll look like in my house 🙂
Natalie- Really the pictures don’t do justice. In person it is really pretty. I am so happy we finally did it 🙂
Charlene, your house is very beautiful
LOL- Tatyana so nice of you! It is not really but I am trying ;). If only money wasn’t an object and there were 28 hours in a day.
I did not think that it looked bad before but I am very impressed with the change. It makes everything look more seamless and fresh. Way to inspire!
You have such a beautiful home! I think the railings look wonderful in white, especially against the dark flooring. You guys did a lovely job.
Oh how nice of you. Thank you Analisa!
I did this in our home about 4 years ago … A lot of hardwork but well worth the transformation !!! I didn’t stop with the railings … All doors and base boards were painted white too !!! I love the kiltz primer … Worked like a charm and then used trim and baseboard paint
Yeah Angela we got rid of all the oak. The baseboards were white but we painted all the cabinets either white or espresso. Looks so nice 🙂
Thank you so much for this!!! I pinned it for the future…It’s been on my bucket list! Christine from Little Brags
Hi. I would use Johnsons clear furniture wax on the railing. I always use it on my furniture, especially my desk and vanities, which take a lot of wear and stains. It is very easy to just clean with soapy cloth and rewax. Use very little and allow to dry. Buff up and it should not be sticky or slippery. Saves the repaint issue for a looooong time. Beautiful job. You home looks fresh and clean.
How has the paint be holding up?
I need to paint my railing spindles white and I really don’t feel like sanding! But I also want a finish that will up stand up to young kids. Please let me know how it’s doing so far. Thanks!
Laurie- we haven’t had any chips. The paint has held up perfectly.
Thank you for this post! You made it look so doable, I think I’m going to try it on my railings next week! Our railings are the same as yours so its easy to imagine how great it will look in our house! Did you use just the white straight out of the can or did you use a shade of white?
Heidi- we used the white from the can. I wanted a very crisp white not an ivory-ish white and that worked well. Get ready for a lot of coats but I bet you are thrilled with the results 😉
Hey love the railings! They look great! We are thinking of doing this soon! Can I ask what color are the walls in your house? I am thinking of paining the walls as well and love that color!
Yes, what is the color of your walls? They go so well with the white. Love it!
Thank you so much Allison. I will try and find the can and post the color. I don’t remember what it is off the top of my head 🙂 We painted those walls about 6 years ago.
They look great! A year has gone by, are they still holding up well without the sanding, or is the paint starting to peel anywhere?
Thanks for sharing!
Hi Jesse- we are noticing spots that needed to be touched up. There were spots where the paint was chipping slightly- it wasn’t terrible but for sure needed a small touch up with paint as it was very noticeable. What we discovered is that our beautiful little girls were taking fingernails and scratching at the paint on the banister that leads from their rooms downstairs- hence the chipping. My little girl was in trouble one day and as my husband was talking to her he watched her nervously picking at a spot on the staircase that we had just touched up and I thought his head might explode 😀 So we did notice that and we couldn’t figure out what was happening to create these little chips in the paint- once that little mystery was solved we really haven’t had any other issues. My photos today would look the same as the ones you see in the post. It was a ton of work but absolutely worth the time.
Thank you so much for the information!! Hopefully your girls can quit that bad habit soon! 🙂
We are doing this right now and i have sanded and primed with sherwin Williams primer and I bought high quality brushes but the primer layer has tons of brush strokes. Will this get better once it’s painted? I am super nervous. Thanks 🙂
Amy- Just try your paint in an inconspicuous spot and see. The first few coats will look terrible but after the primer when you apply the paint it should start to look good.
So glad I found your sight!
Thanks Eve! Can’t wait to hear if this works out for you!
So cool! How does this look close up? How has it held up after a few years?
We have the same builder grade handrails and posts. So glad I came across this project! Yours looks beautiful and it inspired my husband and I. We love ours so much better too! Thank you!
Yeah glad to hear it Kristie! Ours needed a little touch up this year but still look great!
Hello, iam working on my stairs now and realizing what a job this is. I have spirals like crazy on the posts and rails. The primer, after light sanding and cleaning, is very thin and I must really watch for drips and blobs. In comparison your 1sr cost of primer looks great. I use kilz as well. So, Iam testing whether a 2nd coat of primer is better than a 1st coat of trim paint. Iam nervous too and can only imagine what it will take to get it right! Patience is what I need and better painting skills perhaps.
Gah– good luck Debbie. It is a TON of work. 🙁 Now it has been a few years and ours needs to be touched up and I am hiring someone to do it for us. I hope you love the result as much as I do.
Hi. What type of finish did you get for your white? Satin? eggshell?
Hi Alison- I used a semi gloss..
I was looking to paint my stairs, I thought professional painters can help me avoid costly mistakes. But now I believe I can do it. Thanks for sharing your painting project with us and encouraged us.