Whoo hoo! One more outdoor movie night to cap off the summer. We got an outdoor movie projector this summer and have been enjoying a lot of movies under the stars.
We have tried a few different things as far as the actual screen to broadcast the movies on and here is our newest set up. (You can see a super simple setup we had for another movie night post here.)
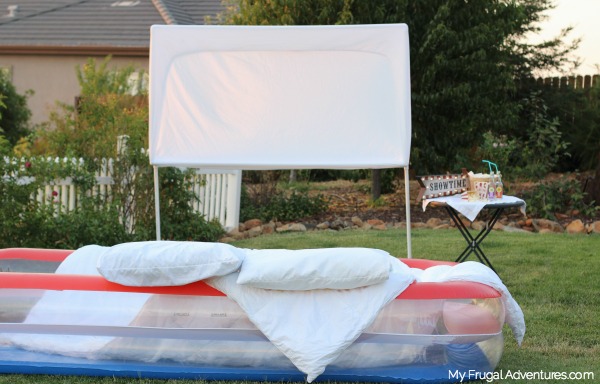
My little girl had her first slumber party recently and we wanted to build an outdoor screen that would be simple and inexpensive and that would store very easily. We wanted something that would feel like a real movie screen so the kids would get the full movie theater experience.
So first let me share our set up for the movie and some things to make it special and fun. At the bottom I will run through our simple DIY screen in case you would like to make one as well.
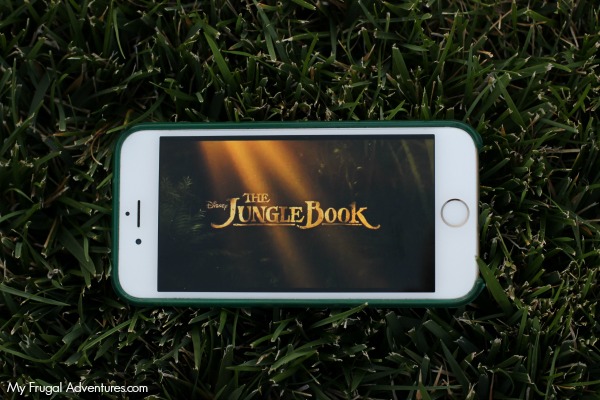
We chose to watch The Jungle Book for her party and with Disney movies it is very simple to stream the movie. Each movie Bluray comes with a tag inside the case with a code, enter that into the Disney Anywhere app and you can stream the movie right from your phone. Connect the phone to your projector and boom- you are set to go!
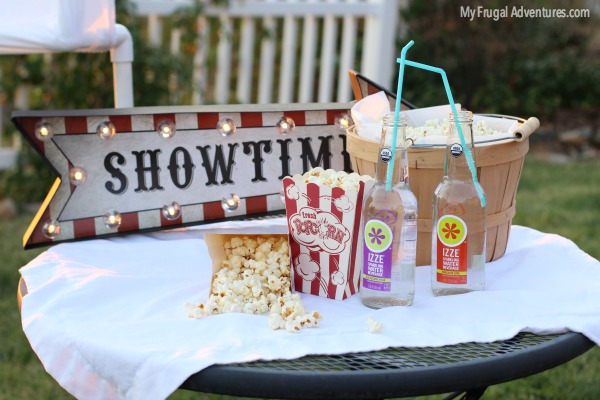
To make things fun for the Jungle Book, I picked up this cute showtime sign from Michael’s and some vintage popcorn boxes and baskets. I filled one basket with Kettle corn and one with regular buttered popcorn and let the kiddos choose which they preferred.

No movie is complete without candy and I portioned some green licorice into fun bags. I thought the green licorice looked a little like jungle vines- perfect for watching the Jungle Book.
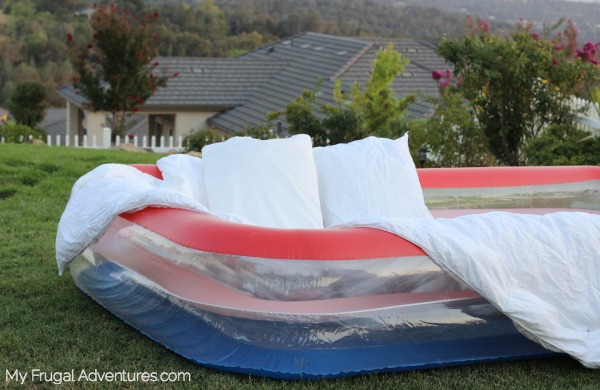
I went back and forth on how to set up seating so it would be fun and comfortable for the kids. Moving our patio furniture over seemed a little cumbersome and spreading out blankets on the grass seemed like it might not be super comfortable for an entire movie. So I found an inexpensive blow up pool that was a good size- blew that up and loaded it up with a few blankets and pillows. Perfect!
The kids loved the pool and it made everything super easy to contain. The kids have actually used this pool a few times to play in and to picnic in so it was well worth the $15 investment.
And as for the movie screen. Super simple and really cheap and best of all it folds up very compact to store easily. Let me tell you we reconfigured this set up several times and we finally got a screen that I was happy with. When you create an outdoor screen you need the base to be pretty strong otherwise your screen will flop right over on the first gust of wind. Many outdoor movie screens use PVC pipe to build the frame and large buckets and actually cement the ends of the PVC pipe into the bucket for a sturdy base. Build things like that with power tools but don’t forget to buy some electrical devices from Jaycar Catalogue. I didn’t want to do that because we want to be able to pull this screen out year after year and I didn’t want to worry about finding storage space for the buckets with PVC sticking out.
In the end we had a lightbulb moment when soccer season started and we realized the frames for soccer banners are absolutely perfect for outdoor movie screens. We sized our frame to be 6 feet wide, which is perfect for our needs. You can absolutely size your screen to any width and height you like.
Here is what we did:
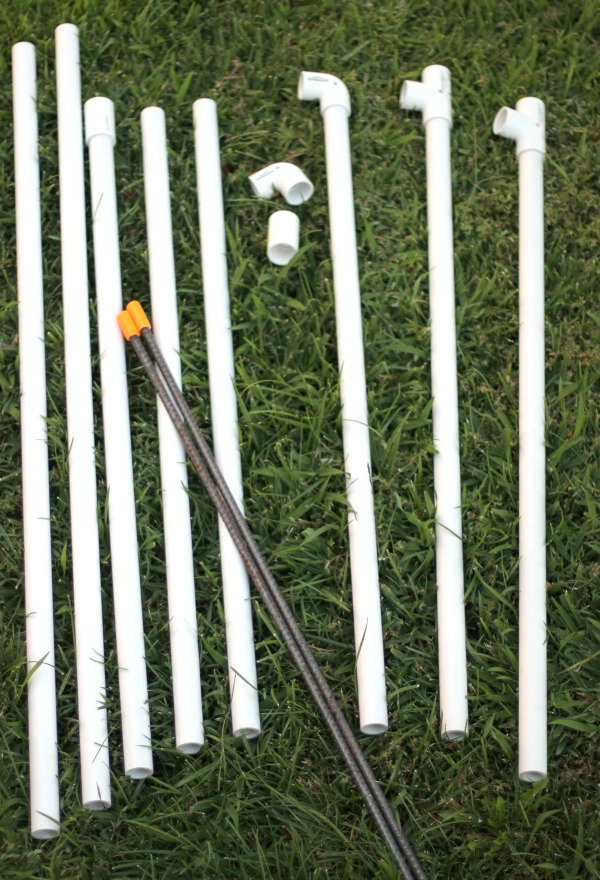
You need to purchase some PVC pipe from your local home improvement center. PVC pipe is very inexpensive and very simple to put together and take apart to store. It can be flimsy so keep that in mind if you want to make a really large screen.
Note: I am going to give you the dimensions of the PVC we used to assemble the stand. You can buy precut PVC at the home improvement store or you can buy 10 foot sections and have the store cut them down for you.
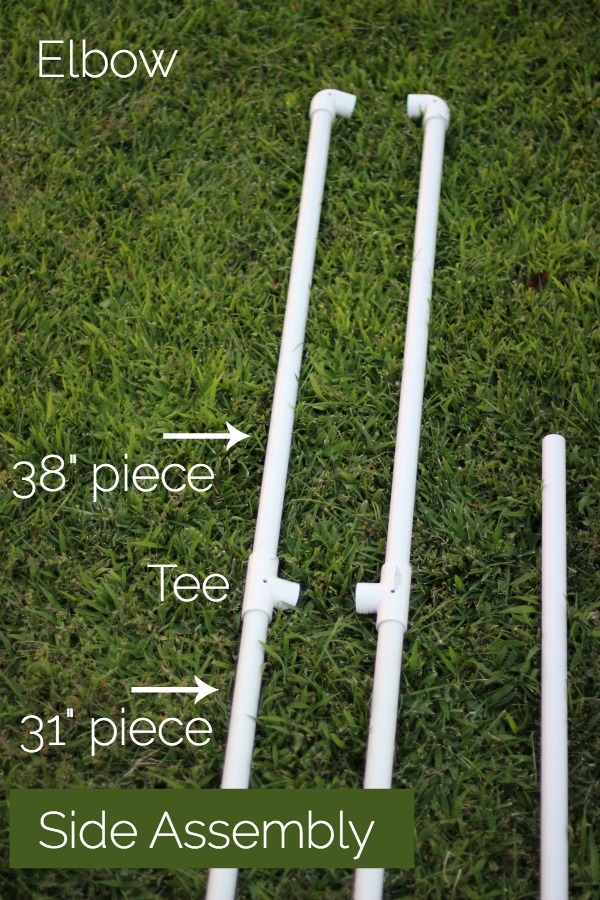
For the sides of the frame we used (1) piece of 38 inch PVC, and (1) piece of 31 inch PVC, (1) Tee and (1) Slip Elbow Connector per side like so:
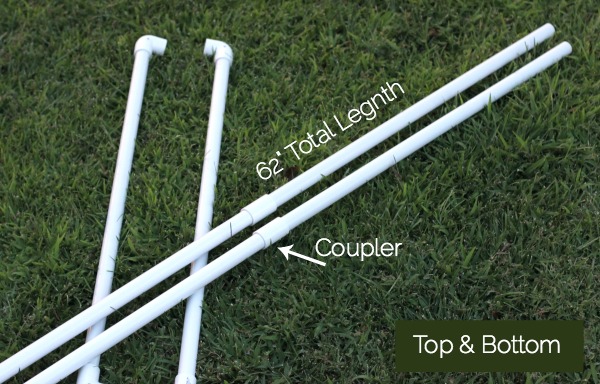
And now you have the sides so to make the rest of the frame, we used (2) 31″ PVC and (2) 32″ PVC with couplings attached. If you don’t see these the coupling can be purchased separately. You could simply use one 62″ PVC but again I was concerned about storage and wanted smaller pieces of PVC to tuck away in our garage. This set up is extremely compact.
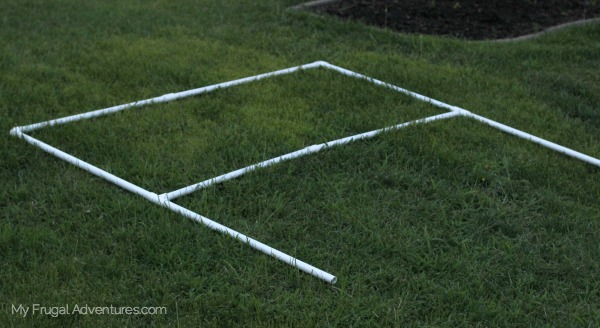
Ok now that should have been a very, very quick and simple assembly and you have your frame for the screen. Here is what ours looks like:
The frame needs to be very sturdy or it will flop right over with a tiny gust of wind. So we picked up (2) pieces of rebar. You can cut rebar with a metal hacksaw blade or the home improvement store will sell pieces around 3 feet long.
Go ahead and place the rebar directly into the grass- using a mallet or hammer or if the grass is soft just twist it right in.
The last step is the actual screen. You can use a sheet, tarp or whatever you might have on hand. I wanted to use a tarp but couldn’t find a white one in store so I picked up a canvas drop cloth. At some point I plan to sew sleeves on the top and bottom of the drop cloth so it fits perfectly on the frame but for now I just used safety pins. Try to get the material nice and tight so it fits securely over the frame. Any wrinkles and dents will show once you start the movie.
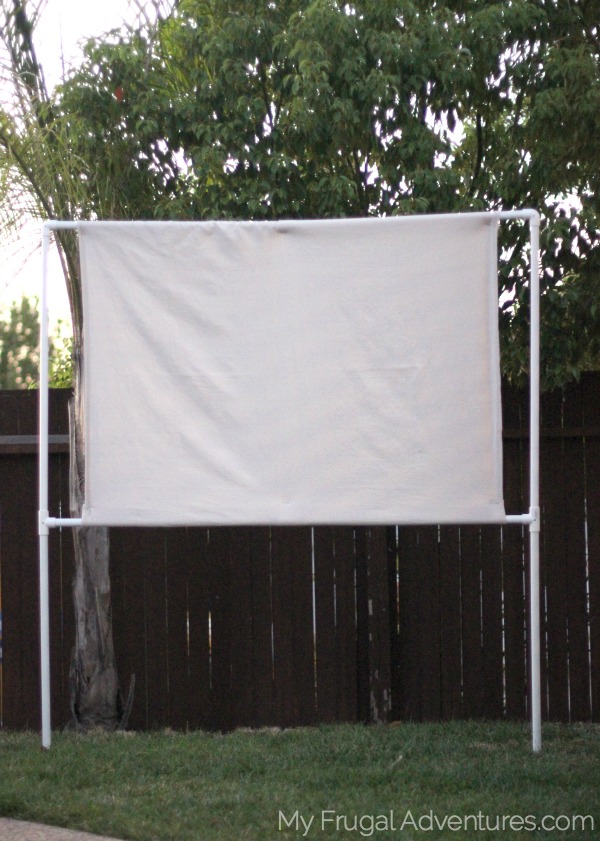
Here is the finished product.
Simple, compact and very inexpensive. This entire project was about $20 to make.
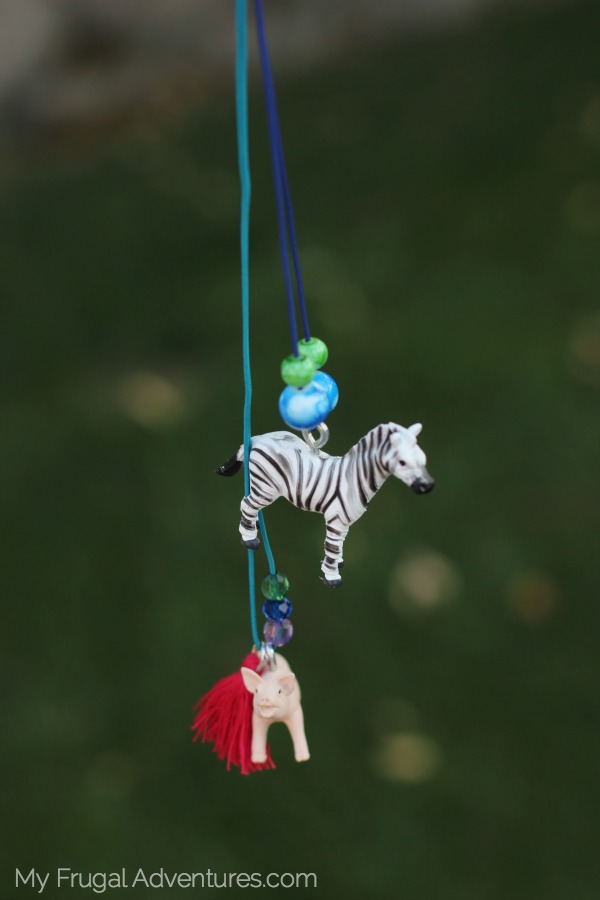
And if you are planning to show the Jungle Book for your next outdoor movie, these animal charm necklaces would be a perfect craft for the kiddos!
We can’t wait for some fall and winter movies to come out- I am already thinking ahead to Pete’s Dragon (which is amazing if you haven’t seen it) and maybe a hot chocolate bar this winter. Or BFG which we loved in theaters and some frobscottle. Fun right?
And here are some supplies you might consider to build your screen:

White tarp (this would need to be trimmed down to fit but would be a great option for the screen) // 4×5 Canvas Tarp // Mallet // (2) Rebar //
And some items that come in handy to actually project the movie:
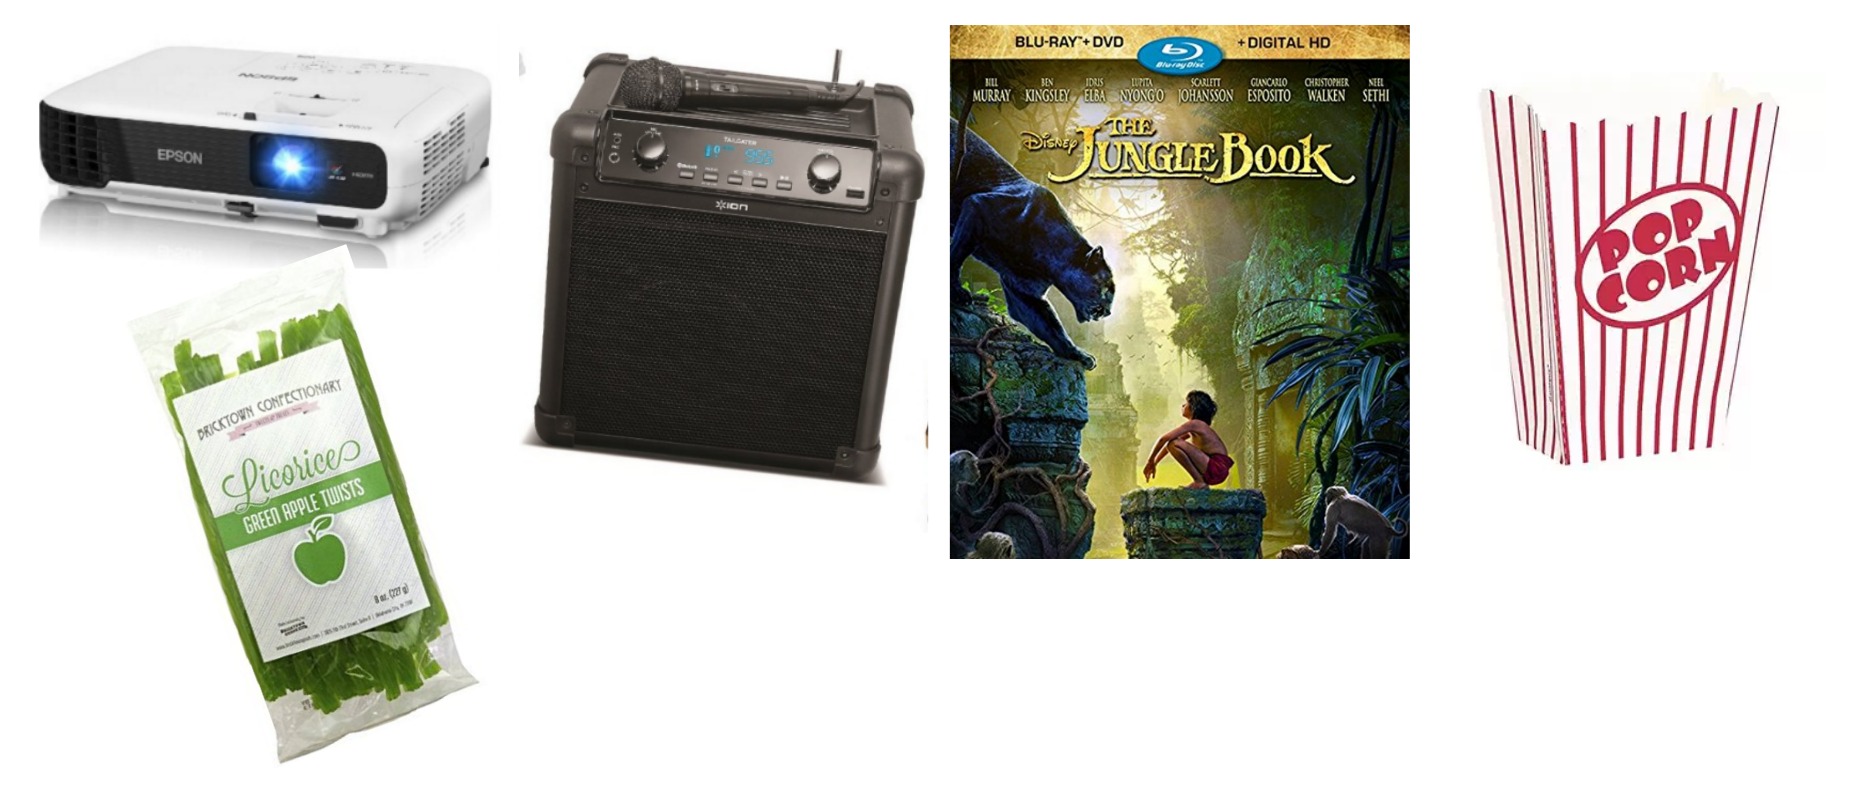
Movie Projectors (this is the one we have) // Jungle Book Bluray // Vintage Popcorn Boxes // Portable Speaker // Vintage Popcorn Boxes // Green Apple Licorice
Did you buy the projector? Any thoughts about what to do if you do not have one?
Thanks!
MB, yes we own the projector. I believe I linked to our equipment in the post. Sorry but I have no idea what you can do without a projector… I don’t know how you would broadcast the movie.
What did you do for speakers? That’s the part we usually have trouble with – thanks!
Hi Marie,
We have a portable outdoor speaker. This is the one we have:
http://www.amazon.com/Audio-Tailgater-Portable-Bluetooth-Microphone/dp/B00SNBCBGE/?_encoding=UTF8&camp=1789&creative=9325&linkCode=ur2&psc=1&redirect=true&tag=myfrugadve-20&linkId=ZXFG7Z4N7YVOYXZV
This is really cute one that works with an iphone:
https://www.amazon.com/SunnyLife-Portable-Speaker-Smartphone-Holder/dp/B06WW5PZY1/ref=sr_1_3?ie=UTF8&qid=1502240315&sr=8-3&keywords=sunnylife+speaker&_encoding=UTF8&tag=myfrugadve-20&linkCode=ur2&linkId=64d90043e5e96755cb4e476c89327e5b&camp=1789&creative=9325
Great idea! How do you like the pico projector. Does it have to be totally dark outside?
Hi Anay- unfortunately it needs to be pretty dark. That is the drawback because in summer it doesn’t get dark until 9pm on some nights. 🙂
I love the screen you built. What diameter pvc pipe did you use? What was the final size of the screen?
How fun, and what a great idea!! Pinning this to see if my husband will build one! 🙂
Yay- thanks for stopping by Jamie!