
One of my goal’s for the New Year has been to spend more one on one time with my big girl.
She is 7 and very into crafts and art projects and this year I am trying harder to make sure we can do more things together that focus on her talents and interests. Plus it is so fun to watch children with craft projects- the creativity is just amazing!
We have been talking about making lip balm for awhile now– both my kids are lip lickers and they get that chappy thing going all the time. I thought this would be a perfect time to make a really good quality lip balm for her and hopefully that will help with the chappy thing and also something fun for us to do together.
I am not a fan of petroleum based lip balms- I have always found them to be very drying. If you do want to make lip balm with your little ones, the simplest recipe ever is just a petroleum jelly and add just a tiny scrape of lipstick/gloss you might have on hand for color or you can tint with Kool Aid or Crystal Light packets etc… (This fancy recipe goes back to my teenage years reading Seventeen magazine- Lol).
But for this project, I wanted to make something that was super moisturizing and since it is for children- something organic and all natural in case they wind up licking it all off. (Totally could happen)
So to make this homemade lip butter is crazy simple and just requires a few ingredients:
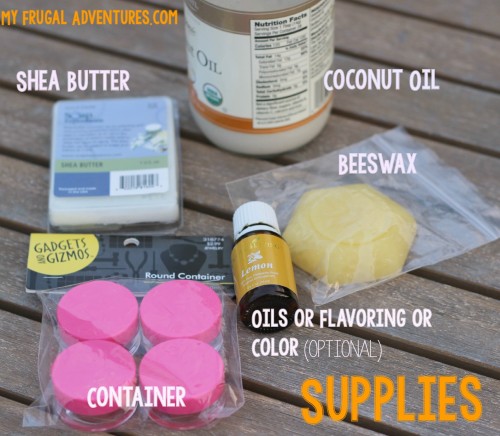
2 tablespoons Shea Butter – I got this at Hobby Lobby for $2.99 or you can buy it here from Amazon
2 tablespoons grated beeswax or beeswax pellets- I got this from Whole Foods for $2.99 in a solid bar or grab it from Amazon here
Lip Gloss containers- anything small will work fine- these are from Hobby Lobby in the jewelry section– again Amazon has a zillion options here or find clear ones for a great price here
4 tablespoons coconut oil – try to use unrefined if you can- grab it from Amazon here
Now comes the easy part– if you have a block of beeswax instead of pellets you need to use some elbow grease to grate it and it is a little hard on your cheese grater- mine left a little residue. But super hot water should get any residue off the grater when you are done. You just want to grate so that it melts easier and faster.
Go ahead and add the coconut oil, beeswax and shea butter to a microwave safe container and microwave for about 30 seconds. I used a mason jar.
Stir well and if the beeswax is not completely melted pop it back in for another 20 seconds and continue stirring, melting, stirring melting until all the pieces of beeswax are completely melted to create an oil that is transparent (it will look like olive oil).
If you would like to add coloring you can do that here- a scrape off a lip stick is perfect or tint with Kool Aid powder. (I tried using Jello powder since we happened to have that and it didn’t mix well and was grainy so we decided to just keep our lip balm untinted.)
You can also add a little hint of fragrance/flavor to your balm with essential oils. I used lemon and citrus in one set of balm and for a second set I used Peppermint. The peppermint has a great fresh fragrance and is a natural breath freshener so perfect to use on a lip balm! Peppermint also has that lovely slight tingly sensation so this one was my favorite.
You could also try grapefruit, orange, cinnamon, lavender, spearmint… whatever you like as long as the oil is therapeutic grade. (I use Young Living- get the details on that here).
For this quantity of balm I would add about 10 drops of essential oil- but you can add more or less depending on how strong you want the fragrance/flavor. Since I was making two flavors, I went ahead and poured the mixture into two containers and added the oils and then poured into the lip balm jars.
Easy and so fast!
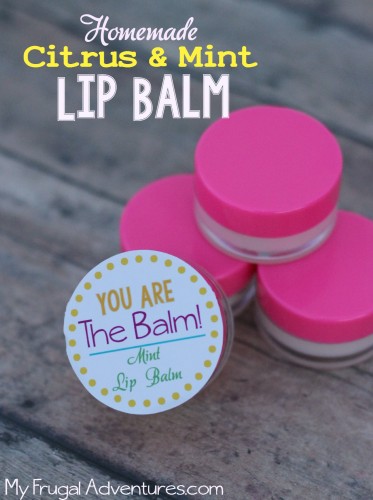
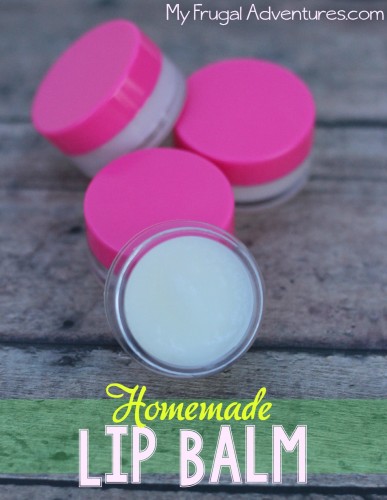
Set aside and let cool for a few hours. The mixture should harden and be ready to use! The quantity above will make about 8 of the small containers you see pictured. This is a little smaller than a Carmex jar.
We made several jars so I just created a simple little label and cut it out using Silhouette sticker paper for my daughter to give to her friends at school. These would be cute party favors or Valentine’s for children.
A few notes:
- Coconut Oil will melt in very warm weather so if you want to make this in summer and find your lip balm is melting, try to keep it in a cool place or pop it in the fridge for a few minutes. You can substitute almond oil if you prefer or even olive oil.
- The shea butter and beeswax are both super moisturizing as well so this should be perfect for dry lips all year long.
- Coconut Oil will help a little with sun protection on your lips so this is nice to use in summer. Obviously this is not a substitute for regular sun protection 🙂
And if you like this recipe, you might also like:
Love this!! My girls love crafty things like this, too. Can’t wait to try this.
I hope they like the lip balm 🙂
I’ve never done anything like this and I’m infringe if I could use a little peppermint extract instead of essential oil?
Thanks so much!
That was supposed to say I’m wondering 🙂
Hi Keri- I think that would be OK. Extract is meant to be added to food so it shouldn’t be toxic or anything. I don’t think it would work quite as well but you can certainly try. I’d be incredibly careful with the amount- extract can be so strong and peppermint often tingles. You wouldn’t want an unpleasant tingling or burning sensation from using too much 🙂
I came across your site while looking for bath soaks…and I have been here for HOURS! Your blog is great, and I have already bookmarked so many pages.
Thank you,
Debbi
Oh what a lovely comment! I am thrilled to hear that. Thank you Debbie! XOXO- Charlene