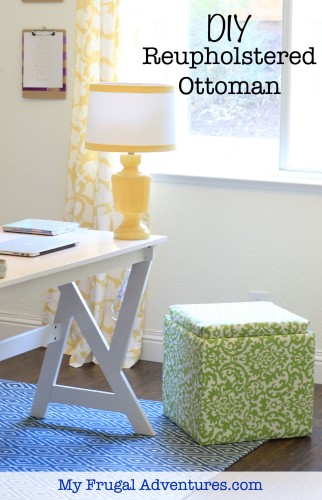
This is a bit of a random post but I gave an old ugly ottoman we had a makeover recently and I was so happy with the results, I wanted to share with you guys.
If you spot an amazing deal on an ottoman in a color or fabric you don’t love, not to worry. It is so simple to customize with the fabric of your choice. These are great for children’s rooms or dorm rooms or anywhere you might need a bit more storage that doubles as seating.
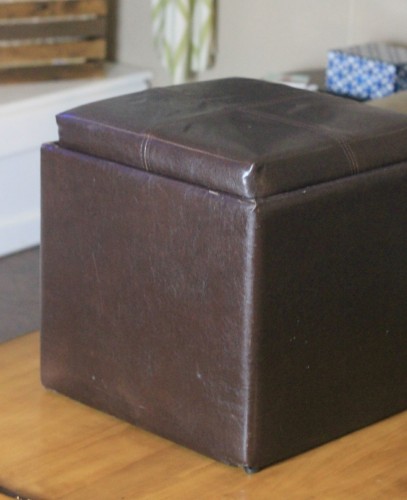
We had this old brown leather ottoman I hated. It has been sitting in the garage just waiting to be dropped off at Goodwill. I could actually use the ottoman in my office but I didn’t want the dark brown color. After recently recovering our kitchen chairs, I found myself with extra fabric and decided to see what I might be able to do with this little ottoman.
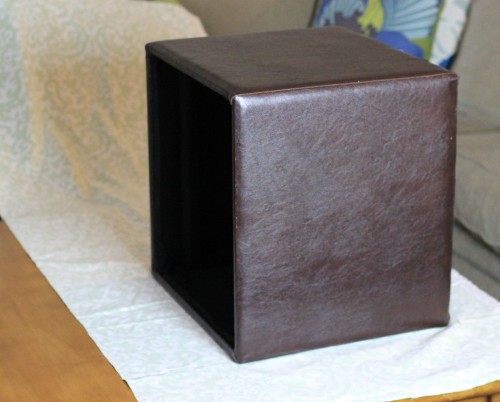
And in about one hour with just a little help from a staple gun, this ugly old thing was totally transformed.
This is the before ottoman- blech!
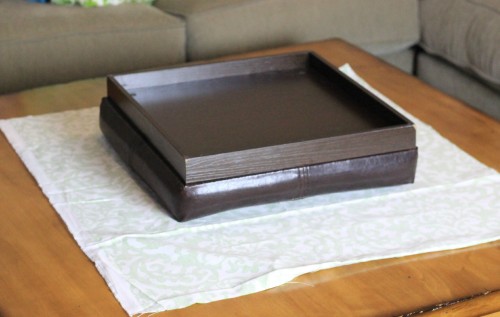
So here is what I did- please note our ottoman has a top that you flip over to find a tray. That made recovering a little tricky, if you don’t have one of these pesky trays, your project should be much easier.
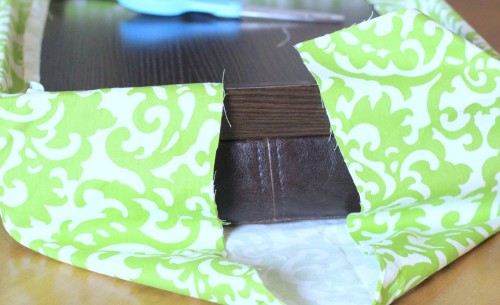
To start with you can either remove the fabric from your ottoman with an exacto knife or you can just cover right over the fabric. Since our makeover fabric was pretty thick, I elected to just cover over the leather. If you do cut off the existing fabric, be sure to save all the foam cushioning or batting inside your ottoman.
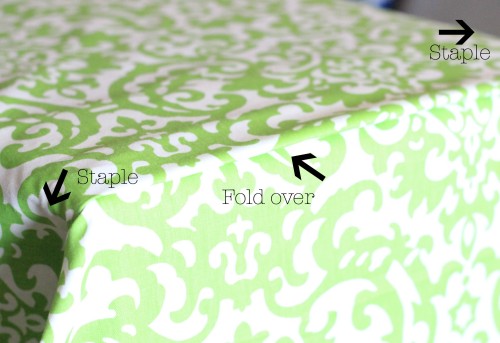
Next I tackled the top. I measured how much fabric I would need and allowed about 6 inches on each side. I cut the fabric and centered the ottoman lid in the middle. I pulled one side extremely tight and used my staple gun to staple in place.
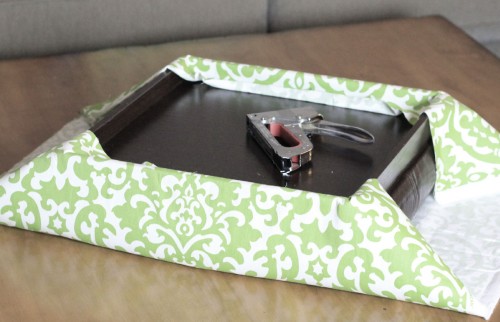
It is very helpful to have someone helping you staple so you can really pull the fabric super, super taut.
After you do two sides, you want to finish the remaining sides like a present. Just fold your fabric in like you are wrapping a gift and tuck the corners. This might take a minute to play with to get a nice, clean finish. The tighter you pull the fabric the more professional it will look so really show it who the boss is.
Once the lid is finished and stapled you can trim off the excess fabric on the inside. This won’t look perfect but hey- it is the inside of an ottoman
I tackled the base of the ottoman next and this took a bit of time to find a way to get the remaining fabric over all the sides. I was literally about two inches short on fabric and finally figured out how to cut a long strip and pull it up and that covered all the sides perfectly with just one cut edge. Before you start this step you will want to remove any feet on the bottom of your ottoman.
I put the ottoman on the side and pulled the fabric taut around all four sides. For the bottom and the top (if you have enough fabric), you might consider folding it over so the cut edge doesn’t show. I think that makes it look a bit more professional and crisp.
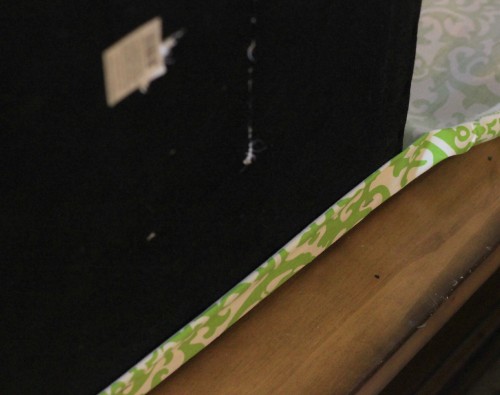
So again I had the entire base of the ottoman covered in fabric and I took one end and stapled about one third of the way up on one side- I stapled on the bottom and the top of the piece where the staples won’t show. Then I pulled that last side over to completely cover the entire piece. I folded the fabric like you see above and then pulled it super tight and stapled on the top and bottom.
And that is it! All done! So simple and fast and I think it looks great. I chose a bold fabric but it looks really fun in my office and is a perfect spot to store files. Plus I have a little seat for my children if they want to come visit me while I work. I use that as a spot for my camera when I taking photos or to spread out a bit more when I am working on a project too.
I hope this makes sense- please feel free to ask any questions you might have in the comments below. Once you get your ottoman in front of you and start this process, I bet it comes together quickly for you.
Here is the finished product:
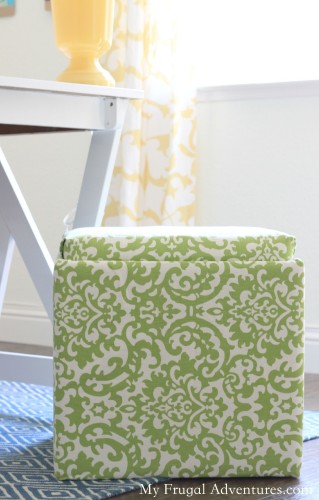
Since this is in my office, the inside currently holds some files and a few supplies- like reams of copy paper. I was thinking this would be perfect for the living room though to hold board games or extra throw blankets or even in the kid’s room for art supplies or crafts.
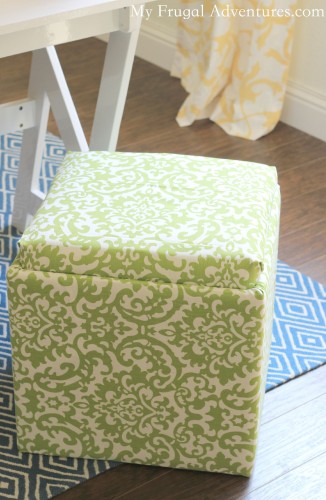
Another look:
And if you decide to tackle this project yourself, please come back and let me know how it works out for you!
Here are a few other posts you might enjoy:

Upcycled Tin Cans- so handy to organize supplies
Very cute! I love your bright color palette. So cheery and fun. 🙂
Love how this turned out. Great project and work. Love that fresh print too. Thanks for the inspiration. Regards,
Thanks so much Amber!
Thanks Elizabeth! I am trying to very slowly redo my office 🙂 It has always been a playroom/office and I finally kicked the kids out 🙂
Love the fabric for the ottoman diy! Can you tell me where you got it?
Hi Gretchen! It is from Joann’s 🙂 I bought it very recently but I will warn you it is dry clean only. Not ideal but it is durable and wipes off quickly so far for us.
Did you staple the fabric directly to the wood on the inside of the tray? Did it make it more snug to put back on?
Hello I love this and have the exact same ottoman! How much fabric did you use?
Hi there! I also have exactly the same ottoman but I would like to keep the tray for use. What did you do with it?
I literally just bought the exact ugly ottoman from FB marketplace to recover as a gift for my boyfriend’s aunt! I am so grateful I found this blog. I can’t wait to see how it turns out! Thanks for sharing your method!
Can you show another photo of how you stapled the lid fabric onto the tray? I can’t tell if you were able to get the fabric beneath the tray or if you just stapled over top of the tray edge. Thanks!