My kids are out of school this week for Spring Break and the weather is just gorgeous. I have been trying to think of things to keep them outside enjoying spring.
On top of that my husband is home this week replacing all of our flooring (Yeah!!) so I really, really need the children out from under everyone’s feet.
So I decided to try this Homemade Puffy Paint idea- I never did get a chance to do this last summer.
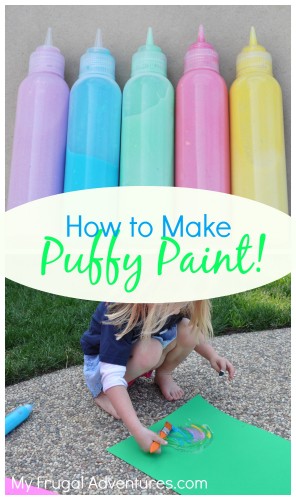
You probably have everything you need on hand already. The only thing I bought are little squeeze bottles. I found these at Hobby Lobby for $.99 each.
You can also just use an artist’s palatte or even muffin tins and paint brushes. I decided to get the squeeze bottles because I am hoping these come in handy all summer when we paint outside. Also I happen to know a certain 3 year old that can get one single M&M and somehow completely coat herself in chocolate, ruin her outfit and require a good shampoo.
Here is what you need:

You don’t have to use food coloring- if I do this again I probably won’t use it again. Mostly for this reason:

Yup my fingers match my shirt now. I think tempura paints or I usually just use a few drops of the Crayola washable finger paints and then you really don’t have to worry about stains and such.
So here is what you do:
- Mix 1/2 cup salt
- With 1/2 Cup flour
- and 1/2 cup water
Add your food coloring or paint until it gets to the desired color and mix well. (Try to get the lumps out.)
Now put it in the container of your choice- if you use little bottles like I did you might stop off at the Dollar Store and grab a funnel. If you can’t be bothered with that don’t worry- I just added slightly less salt and flour to make it really easy to pour into the bottles.
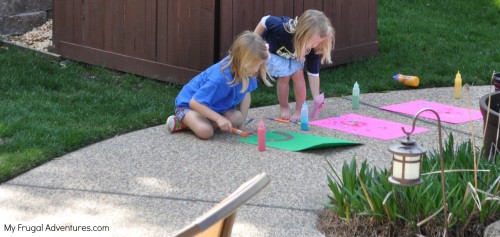
This is thick paint so you want to use cardboard or something stronger then a regular sheet of paper. I had some poster board in the garage so the girls used that to paint.

And overall the girls had fun with this. The paint will take awhile to dry so you can either leave it outside or you might try a hair dryer (make sure it isn’t so close it splatters everything.)
The texture is different and one last little thing. I originally used the plain old food coloring but the colors looked sad and dull to me. I switched over to some McCormick Neon food color and those colors came out really pretty.
My 5 year old did great with the squeeze bottles but my preschooler did wind up going for paint brushes.
The recipe above makes enough to fill about 2 of the squeeze bottles you see pictured above. I just did a batch, added to to another bowl and stirred in the color- used a spoon to drip it into the bottle. Mixed up another color and so on. It is a pretty fast process.
Thanks to Family Fun magazine for the recipe!
PS: Don’t you just love those chubby little feet? These are the coolest little ladies I know.
And if you decide to try this project, here are a few other things that might be fun:
- Super Simple Homemade Playdoh
- Homemade Oobleck (this is something your kids will LOVE!!)
- Freezer Pop painting
- Easy Ivory Soap Clouds (great for bathtime after your painting projects)
- Fast recipe for homemade bubbles (way better then the bottle stuff)
- Easy colored rice (great alternative to sand)
- DIY Bath Jellies
So fun! Thanks 🙂
Great idea and such adorable kiddos you have! Getting so big!
That looks fun. Does it have the squishy feel if you touch it after it dries? does the texture look like rolling hills? (what texture of t-shirts with puffy paint look like to me)
Cathy, it depends how thick the kids put it on. It does try bumpy but we left it outside to dry in the sun and the color faded a little. I don’t personally think this is something that would be preserved for years because of the quality ;). But it was a fun way to keep them busy for an afternoon. I put the paint in a Ziploc and I am hoping we can use it again maybe next week.
Jealous of your new floors! Lucky you have a handyman hubby. I’m stuck with flooring from the ’70s, eek 🙁
do we have to microwave ?
Can you put this on t shirts??
Courtney- I would use a real fabric paint or something. You could put it on a shirt but it would wash off and probably be a mess.
This will not work on fabric that will be washed and will not be archival. If you think about it as a cook you know flour will wash away after you make bread or even after you bake it. You might try adding some clear acrylic medium to it but if you spend that much money you might as well buy the product already made.
Such a neat idea! My kids love anything that involves paint. We are going to give this one a try. Thanks for your blog post!
I just did this with my son. How do I get the clumps out? They get stuck in the spout of the squeeze bottles and then when it finally let go, there is a huge blob of paint on the picture. Kids are now upset that their picture is ruined!! Also, does it get puffier than the thickness of the liquid itself?? Seems it isn’t really puffy paint, but rather just thick paint. Help!!!
Hi Brenda- I am not sure about clumps we didn’t have that problem with ours.